Overview
iGrad is a desktop module management and graduation tracking application. The user interacts with it using a CLI, and it has a GUI created with JavaFX, FXML and CSS.
Summary of contributions
-
Major enhancement: added the ability to add, edit and delete modules
-
What it does: allows the user to add, edit and delete modules.
-
Justification: This feature is crucial in allowing the application to run as intended. A user can add a module with a module code, title and module credits. They can also tag the module with a semester.
-
Highlights: This feature was done mainly by refactoring existing code.
-
Credits: The original AB3 for laying down most of the code.
-
-
Major enhancement: added the ability to add modules based on information from NUSMods
-
What it does: allows the user to add multiple modules at one time based on information from NUSMods.
-
Justification: This feature improves the product significantly because a user can make mistakes while typing in module information and getting the information directly from NUSMods solves this problem. In addition, the user is now able to add up to 10 modules at a time without having to specify more details other than the module code. This speeds things up significantly from having not only to key in modules one by one, but also to fill up all the details. Finally, this feature also allows to check for module prerequisites and preclusions that the user might not be aware of.
-
Highlights: The only HTTP request made in the whole application.
-
Credits: NUSMods (for making all the data public and free to use)
-
-
Major enhancement: added the ability to undo a previous command
-
What it does: allows the user to undo a previous command.
-
Justification: This feature improves the product significantly because a user can make mistakes in commands and the app should provide a convenient way to rectify them.
-
Highlights: Had to choose between different implementations of this command.
-
-
Major enhancement: added the ability to filter modules
-
What it does: allows the user to filter modules based on certain parameters.
-
Justification: This feature improves the product significantly because a user can face difficulty when attempting to look for a certain module.
-
Highlights: Added the option to chain parameters by different logical operators, allowing users maximum flexibility
-
-
Major enhancement: added and designed a clean and user-friendly Graphical User Interface (GUI)
-
What it does: improves the user experience greatly
-
Justification: This feature improves the product significantly because no matter how well an application functions, nothing matters if the user experience is poor.
-
Highlights: Inclusion of an animal guide, displaying inspirational quotes and a progress bar.
-
Credits: Daryl for the first few iterations and implementations of the GUI, help panel and image designs.
-
-
Major enhancement: added the ability to export module data
-
What it does: exports modules tagged with a semester to a .csv file titled study_plan.csv
-
Justification: This feature improves the product significantly because it saves the user a lot of time should they wish to copy the data somewhere else. The file generated by this command can be used to submit to school administration for exchange programme, leave of absence and internship applications.
-
Highlights: Only command to write to a .csv file.
-
-
Minor enhancement: did the logic and interface to select an animal guide
-
Minor enhancement: added a quote generator that displays a random quote each time a command is entered
-
Code contributed: [Functional code] [Test code]
-
Other contributions:
-
Project presentation:
-
Designed the theme used for the project presentation
-
-
Bug fixes:
-
Community:
-
Reported bugs and suggestions for other teams in the class
-
-
Contributions to the User Guide
Given below are sections I contributed to the User Guide. They showcase my ability to write documentation targeting end-users. |
Module Auto Add
Section by: Wayne
This command adds a module to the module list. The module information is taken
from the NUSMods API and includes the MODULE_CODE, MODULE_TITLE
and MODULE_CREDITS.
Purpose |
Adds a module from NUSMods |
Syntax |
|
Example |
|
How it Works
Do not miss out the -a flag
|
When you type in this command, a request is made to NUSMods API. More specifically, we visit the module page and ask for the information provided there. An example page can be found here.
| We try to get the module information from the current academic year. However, this might not always be possible as NUS might not have released the module details. As a contingency, we retrieve the module information from the previous academic year. |
In general, using this command speeds up the process of module addition greatly. However, as we have to make a request to an external webpage, the time taken to process the request might be considerably longer.
| After issuing the command, the app might seem to freeze. Not to worry! It is merely processing your request. Please be patient when executing this command, especially when attempting to add a large number of modules. |
This command also supports batch processing and you can add multiple modules, with the necessary information all filled in, by issuing a single command. In the case where adding a single module in a batch of modules raises an error, we skip that module and let you know what went wrong.
You can add up to 10 modules at once! Try this: module add n/CS1101 n/CS1231 n/CS2030 n/CS2040 n/CS2100 n/CS2103T n/CS2105 n/CS2106 n/CS3230 n/CS3219 -a
|
Module Auto Add Error Reference lists the errors you might encounter after issuing this command:
| Name | Message | Explanation | Solution |
|---|---|---|---|
Duplicate Module Error |
Duplicate Detected |
Sorry, this module already exists in the course book. |
Delete the existing module in the list and try again |
Module Not Found Error |
Module Not Found |
Sorry, I was unable to find this module. Is your internet down? |
Use the command [ModuleAddCommand] instead |
Module Overload Error |
Module Overload Error |
Please do not attempt to add more then 10 modules. |
Divide the list of modules into smaller batches of size less than 10 and try again |
Connection Error |
Connection Error |
Sorry, I was unable to find this module. Is your internet down? |
Whilst all other commands work offline. You need an internet connection to issue this command. Go online before trying again |
Tutorial
Follow these steps to get a clearer idea of how this command works
| For this tutorial, actual values will be given instead of placeholders. Undo or Delete objects created from this tutorial by using the appropriate commands |
-
Check that you do not have the modules with
MODULE_CODECS2103T and CS2101 in your list of modules -
Type the following into the command box
module add n/CS2103T n/CS2101 -aand press enter -
Wait for up to 5 seconds
-
The message in the response box should change and you should see the following in the module panel
 Figure 1. Modules CS2103T and CS2101 successfully added from NUSMods
Additional Information
We are also able to retrieve information pertaining to a module’s prerequisites and preclusions. However, as our app can function as a module planner in addition to tracking your graduation requirements, we do not prevent you from adding modules that have unfulfilled prerequisites but instead, simply show a warning.
| As the prerequisites and preclusions from NUSMods do not follow any standard formatting, the warning messages shown might not always be accurate. This is due to a difficulty of interpreting the data given by NUSMods. This remains a BETA feature and we hope to upgrade it in time. |
Contributions to the Developer Guide
Given below are sections I contributed to the Developer Guide. They showcase my ability to write technical documentation and the technical depth of my contributions to the project. |
Module Add Auto
Section by: Wayne
Overview
The "automatic" addition of modules allows users to add up to 10 modules at once with all non-optional values filled in.
This is done by making a HTTP GET request to the NUSMods API and fetching the module data
given in a JSON format.
Implementation
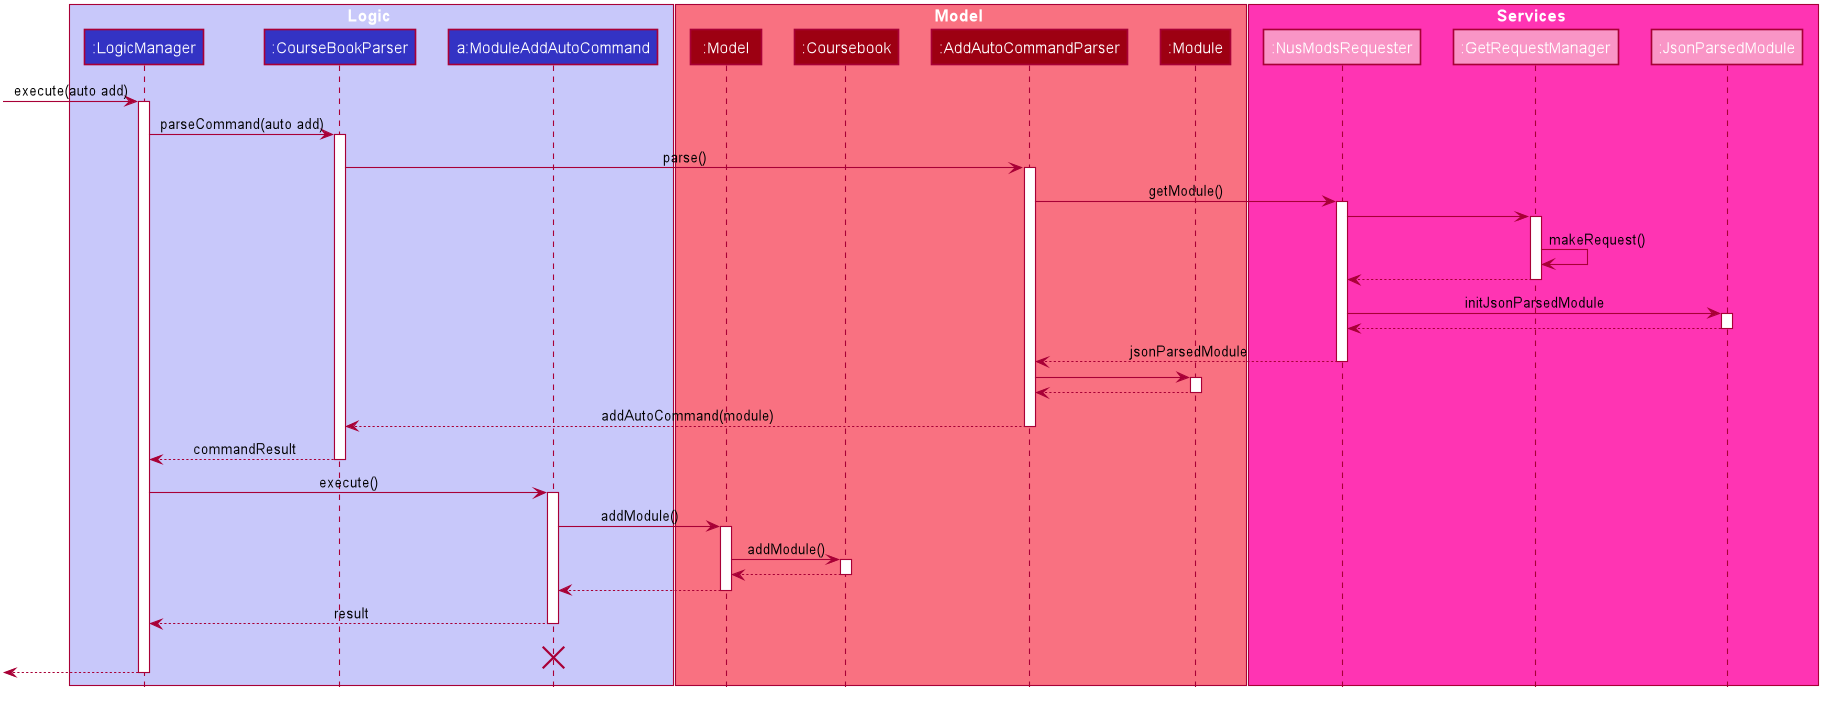
The automatic filling in of module details on addition of a new module is facilitated by NusModsRequester.
It creates a new instance of GetRequestManager which it relies on to make a request to the NUSMods API.
Upon receiving a response, it creates an instance of JsonParsedModule.
JsonParsedModule parses the JSON object given in the response of the initial request and stores the following values:
| Value Type | Name | Example |
|---|---|---|
String |
title |
Software Engineering |
String |
moduleCode |
CS2103T |
String |
credits |
4 |
String |
prerequisite |
CS2040C or (CS2030 and (CS2040 or its equivalent)) |
String |
preclusion |
CS2103, CS2103T, (CS2113T for CS2113), (CS2113 for CS2113T) |
JsonParsedModule Table of Values illustrates the difficulty in parsing prerequisites and preclusions as
the data provided is not in a standard format
|
The created JsonParsedModule object is then converted into a Module object, which is subsequently added
to the courseBook via the method addModule of the ModelManager.
Module Add Auto Sequence Diagram illustrates this:

Design Considerations
Most of the design considerations arose as a result of having to make a network request.
A secondary module addition feature
As with all network requests, this feature might not work as intended in certain circumstances. Possible cases are:
-
High Network Congestion
-
Poor Network Connection
-
NUSMods Offline
In such situations, it becomes difficult or impossible to carry out the addition of modules using this command.
Therefore, this feature was built on top of the primary module add feature, ensuring that the user
could still manage to add modules even when faced with the issues as listed above.
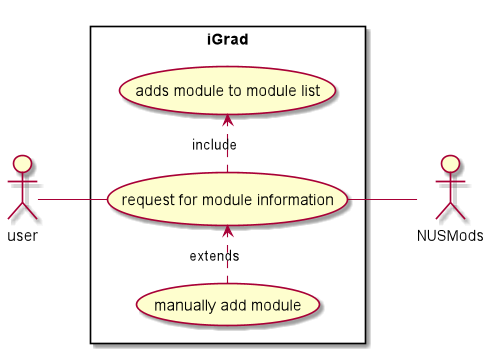
The use case for this situation is as follows:
System: iGrad
Use case: UCM1 - Add module via NUSMods
Actor: User, NUSMods
MSS:
-
User wants to add a module.
-
iGrad requires user to specify the module codes.
-
User enters the module codes corresponding to the modules he wishes to add.
-
iGrad sends a request to NUSMods.
-
NUSMods responds with the requested data.
-
iGrad adds the module to the module list.
-
User views the module in the module list.
Use case ends.
Extensions:
5a. NUSMods does not respond with the requested data.
5a1. User adds module manually
