By: AY1920S2-CS2103T-F09-3 Since: Feb 2020 Licence: MIT
- 1. Setting up
- 2. Design
- 3. Implementation
- 4. Documentation
- 5. Testing
- 6. Dev Ops
- Appendix A: Product Scope
- Appendix B: User Stories
- Appendix C: Use Cases
- 7. Non Functional Requirements
- Appendix D: Glossary
- Appendix E: Instructions for Manual Testing
1. Setting up
Refer to the guide here.
2. Design
2.1. Architecture
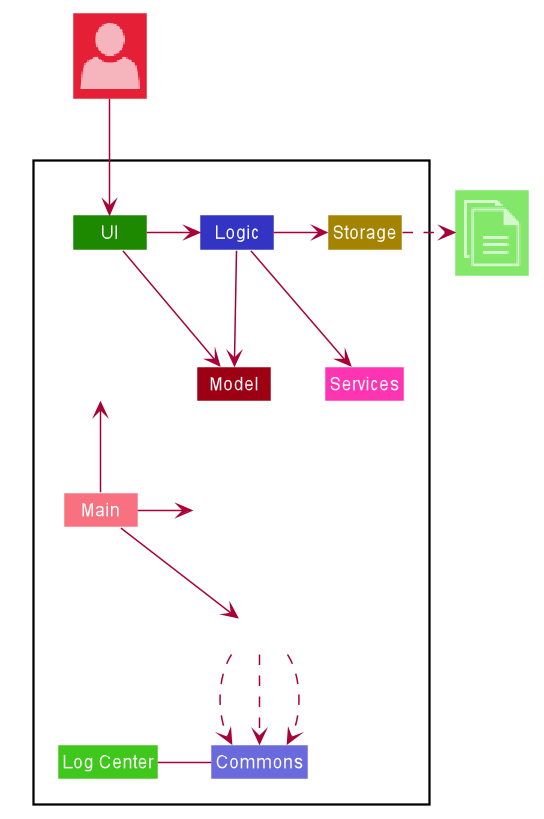
The Architecture Diagram given above explains the high-level design of the App. Given below is a quick overview of each component.
The .puml files used to create diagrams in this document can be found in the diagrams folder.
Refer to the Using PlantUML guide to learn how to create and edit diagrams.
|
-
At app launch: Initializes the components in the correct sequence, and connects them up with each other.
-
At shut down: Shuts down the components and invokes cleanup method where necessary.
Commons represents a collection of classes used by multiple other components.
The following class plays an important role at the architecture level:
-
LogsCenter: Used by many classes to write log messages to the App’s log file.
The rest of the App consists of five components.
Each of the first four components
-
Defines its API in an
interfacewith the same name as the Component. -
Exposes its functionality using a
{Component Name}Managerclass.
For example, the Logic component (see the class diagram given below) defines its API in the Logic.java interface and exposes its functionality using the LogicManager.java class.
How the architecture components interact with each other
The Sequence Diagram below shows how the components interact with each other for the scenario where the user issues the command delete 1.
module delete CS1010 commandThe sections below give more details of each component.
2.2. UI component
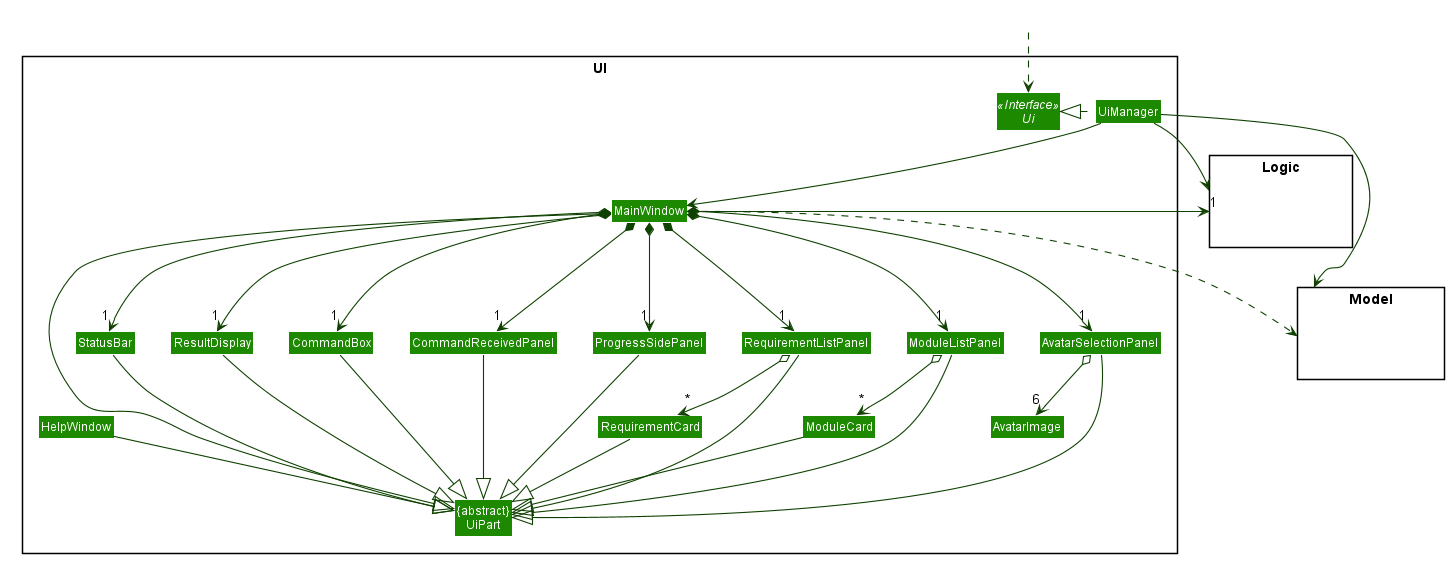
API : Ui.java
Section by: Daryl
The UI consists of a MainWindow that is made up of parts e.g.CommandBox, ResultDisplay, ModuleListPanel, StatusBar etc.
All these, including the MainWindow (excluding AvatarImage), inherit from the abstract UiPart class.
The UI component uses JavaFx UI framework.
The layout of these UI parts are defined in matching .fxml files that are in the src/main/resources/view folder.
For example, the layout of the MainWindow is specified in MainWindow.fxml.
The UI component,
-
Executes user commands using the
Logiccomponent. -
Listens for changes to
Modeldata so that the UI can be updated with the modified data.
2.2.1. MainWindow
The MainWindow class serves as the hub for all the UI components, and contains the following UI classes:
-
AvatarSelectionPanel- Avatar selection screen on first-time startup. -
CommandBox- Command box for user input. -
CommandReceivedPanel- Displays the last command entered. -
ResultDisplay- Displays the resultant message of the command entered. Also contains the avatar image. -
ModuleListPanel- Panel displaying the modules input into the system. -
RequirementListPanel- Panel displaying the requirements input into the system. -
ProgressSidePanel- Panel displaying the user’s academic progress and fundamental details (Eg. CAP).
The MainWindow coordinates the development between the backend and frontend components to induce a visible change to the interface.
This is done through the executeCommand(String commandText, Model model) method. Upon user input, the logic class
executes the command in commandText, and the model is updated to reflect the changes. Subsequently, after the model
has been updated, the following UI classes ResultDisplay and ProgressSidePanel are refreshed as a result.
2.2.2. AvatarSelectionPanel
The AvatarSelectionPanel class displays the avatar selection screen upon first-time startup. Users will choose an
that will act as a guide throughout their usage of the application.
2.2.3. CommandBox
The CommandBox class contains an editable TextArea JavaFX component which allows the user to enter input commands.
2.2.4. CommandReceivedPanel
The CommandReceivedPanel class contains a panel that shows the last command entered into the system.
Here is an example of how the CommandReceivedPanel works:
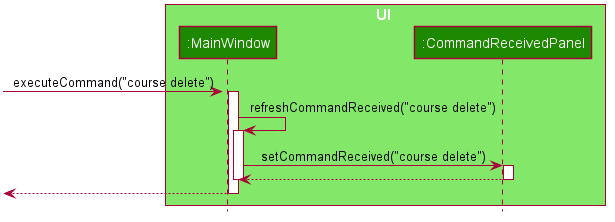
-
Command executed on
MainWindow. -
MainWindowcalls the methodrefreshCommandReceivedPanel, which refreshes theCommandReceivedPanel. -
CommandReceivedPanelupdates its JavaFXLabelwith theStringof the command given. -
CommandReceivedPaneldisplays visible change on the interface. -
refreshCommandReceivedPanelends execution.
2.2.5. ResultDisplay
The ResultDisplay class shows the resultant message generated from the user’s input.
The avatar will also showcase a different expression according to the success of the command given.
Here is an example of how the ResultDisplay works:
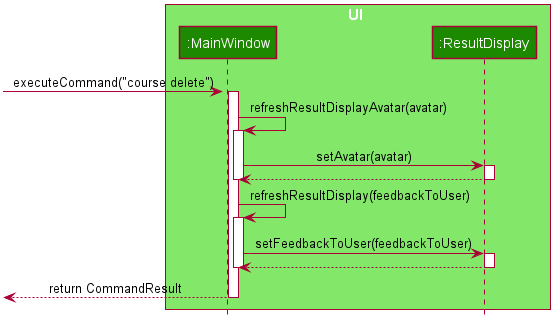
-
Command executed on
MainWindow. -
MainWindowcalls the methodrefreshResultDisplayAvatar, which refreshes theAvatarinResultDisplay. -
ResultDisplayupdates its JavaFXImageViewaccording to theAvatarof the command given. In this case, when no exception is thrown, theAvatardisplays that of a positive expression. -
refreshResultDisplayAvatarends execution. -
ResultDisplaydisplays visible change on the interface. -
MainWindowcalls the methodrefreshResultDisplay, which refreshes the resultant message displayed inResultDisplay. -
ResultDisplayupdates its JavaFXTextAreaaccording to theCommandResultof the command given. In this case, the TextArea will display the 'success' message generated as a result of the command. -
ResultDisplaydisplays visible change on the interface. -
refreshResultDisplayends execution.
2.2.6. ModuleListPanel
The ModuleListPanel class contains the ObservableList<Module> JavaFX component allowing for a list view of the
components inside it, in this case, a list of ModuleCard objects.
The contents of the list are dependent on the modules that the user has input into the system. Each module will be
displayed as a ModuleCard object.
2.2.7. RequirementListPanel
The RequirementListPanel class contains the ObservableList<Requirement JavaFX component allowing for a list view of
the components inside it, in this case, a list of RequirementCard objects.
The contents of the list are dependent on the requirements that the user has input into the system. Each requirement
will be displayed as a RequirementCard object.
2.2.8. ProgressSidePanel
The ProgressSidePanel class contains the user’s academic progress, as well as essential information. The following
information is displayed on the ProgressSidePanel:
-
Coursename -
Inspiring quote from
QuoteGenerator -
Modular Credits Progress Indicator
-
Semestersleft -
Current Cumulative Average Point (C.A.P)
Here is an example of how the ProgressSidePanel works:
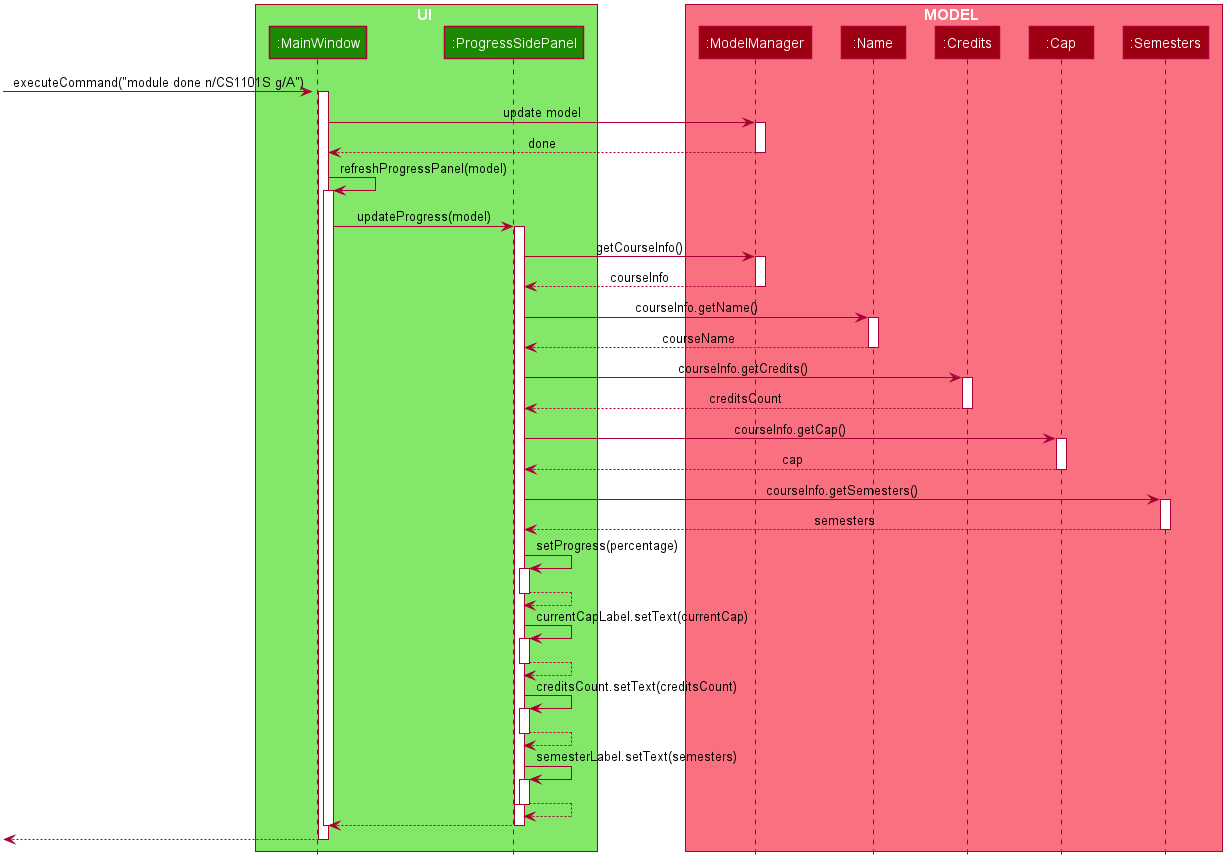
-
Command executed on
MainWindow. -
Modelis updated. -
MainWindowcalls the methodrefreshProgressPanel, which refreshes theProgressSidePanel. -
ProgressSidePanelusesModelto obtain the correspondingCourseInfoinformation:-
Name -
Credits -
Cap -
Semesters
-
-
ProgressSidePanelexecutes corresponding JavaFX methods to update displayed information. -
ProgressSidePanelshows visible change on the interface. -
refreshProgressPanelends execution.
2.2.9. Other Components
In addition to the main UI components grouped in the MainWindow class, these are the other UI components that are
relevant to the interface:
-
AvatarImage- Contains the image of the avatar. -
ModuleCard- Individual card containing the relevant information of the module. List ofModuleCardcontained in theModuleListPanel. -
RequirementCard- Individual card containing the relevant information of the requirement. List ofRequirementCardscontained in theRequirementListPanel. -
HelpWindow- Pop-up window containing the link the User Guide, as well as a list of all the commands in the application.
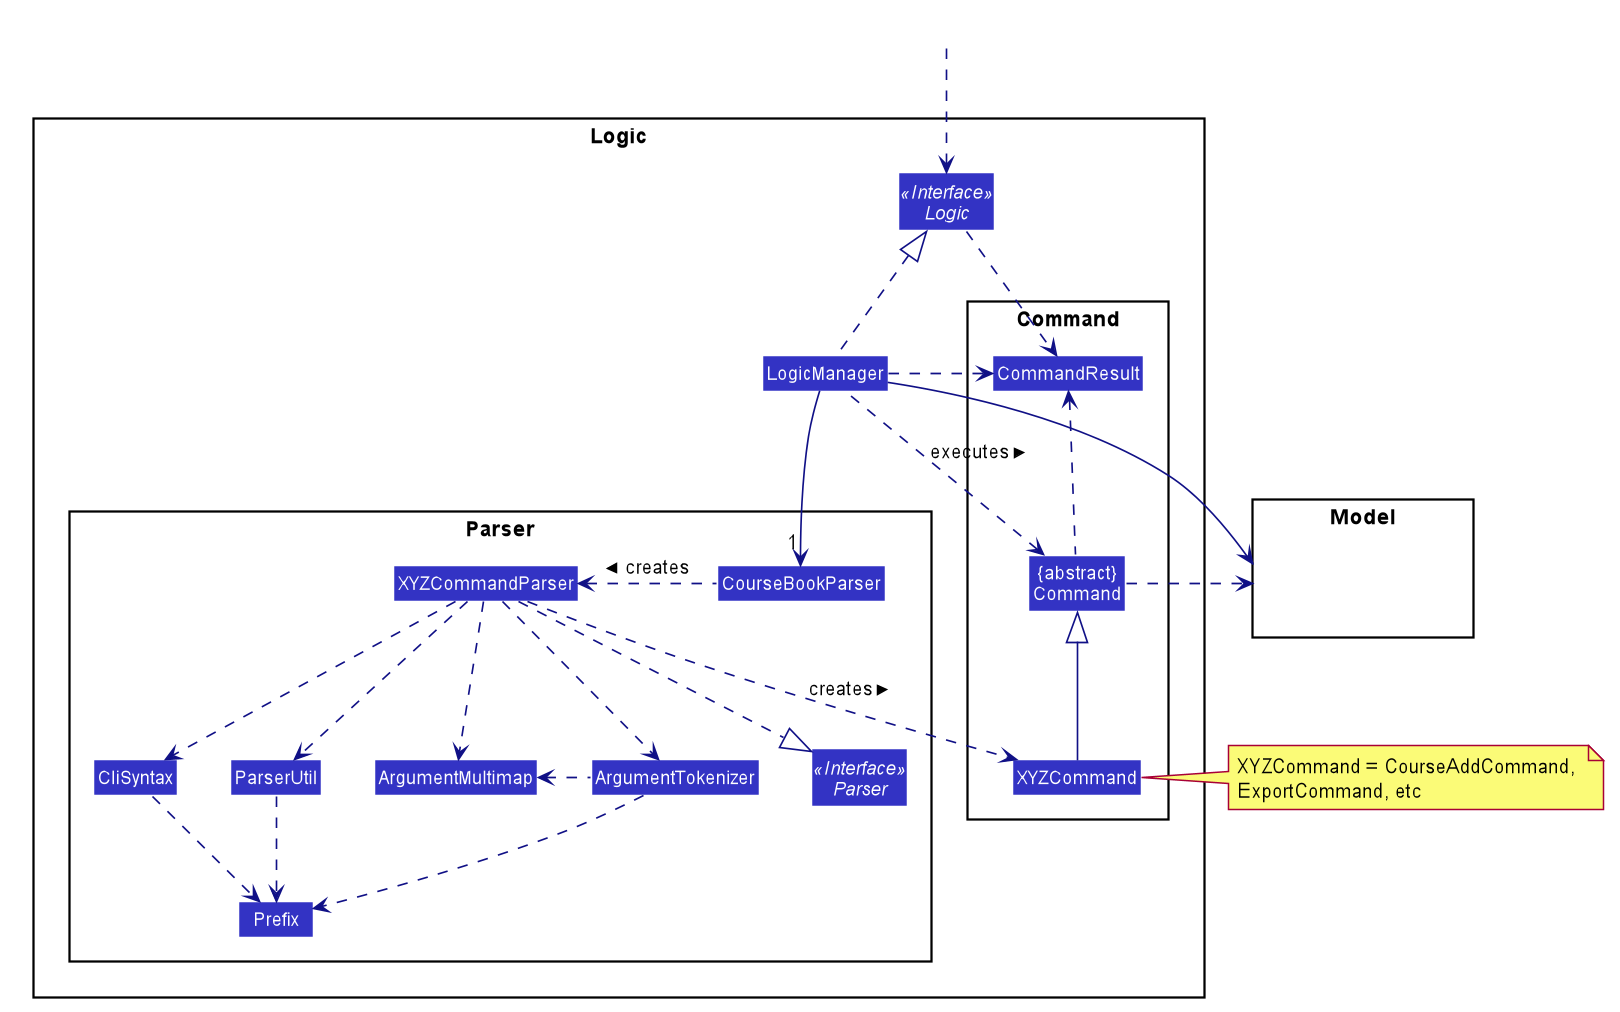
2.3. Logic component
API :
Logic.java
-
Logicuses theCourseBookParserclass to parse the user command. -
This results in a
Commandobject which is executed by theLogicManager. -
The command execution can affect the
Model(e.g. adding a module). -
The result of the command execution is encapsulated as a
CommandResultobject which is passed back to theUi. -
In addition, the
CommandResultobject can also instruct theUito perform certain actions, such as displaying help to the user.
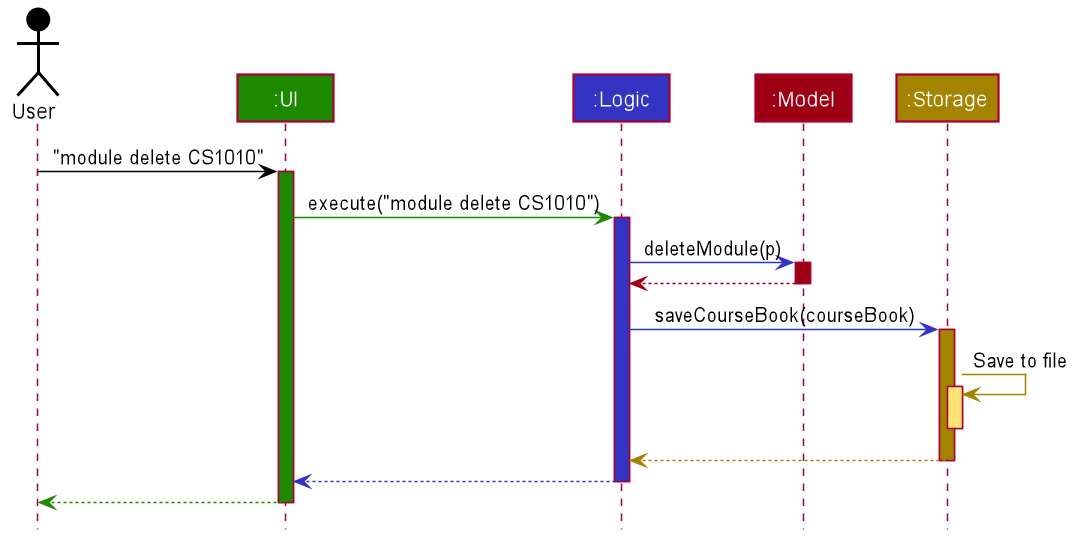
Given below is the Sequence Diagram for interactions within the Logic component for the execute("delete 1") API call.
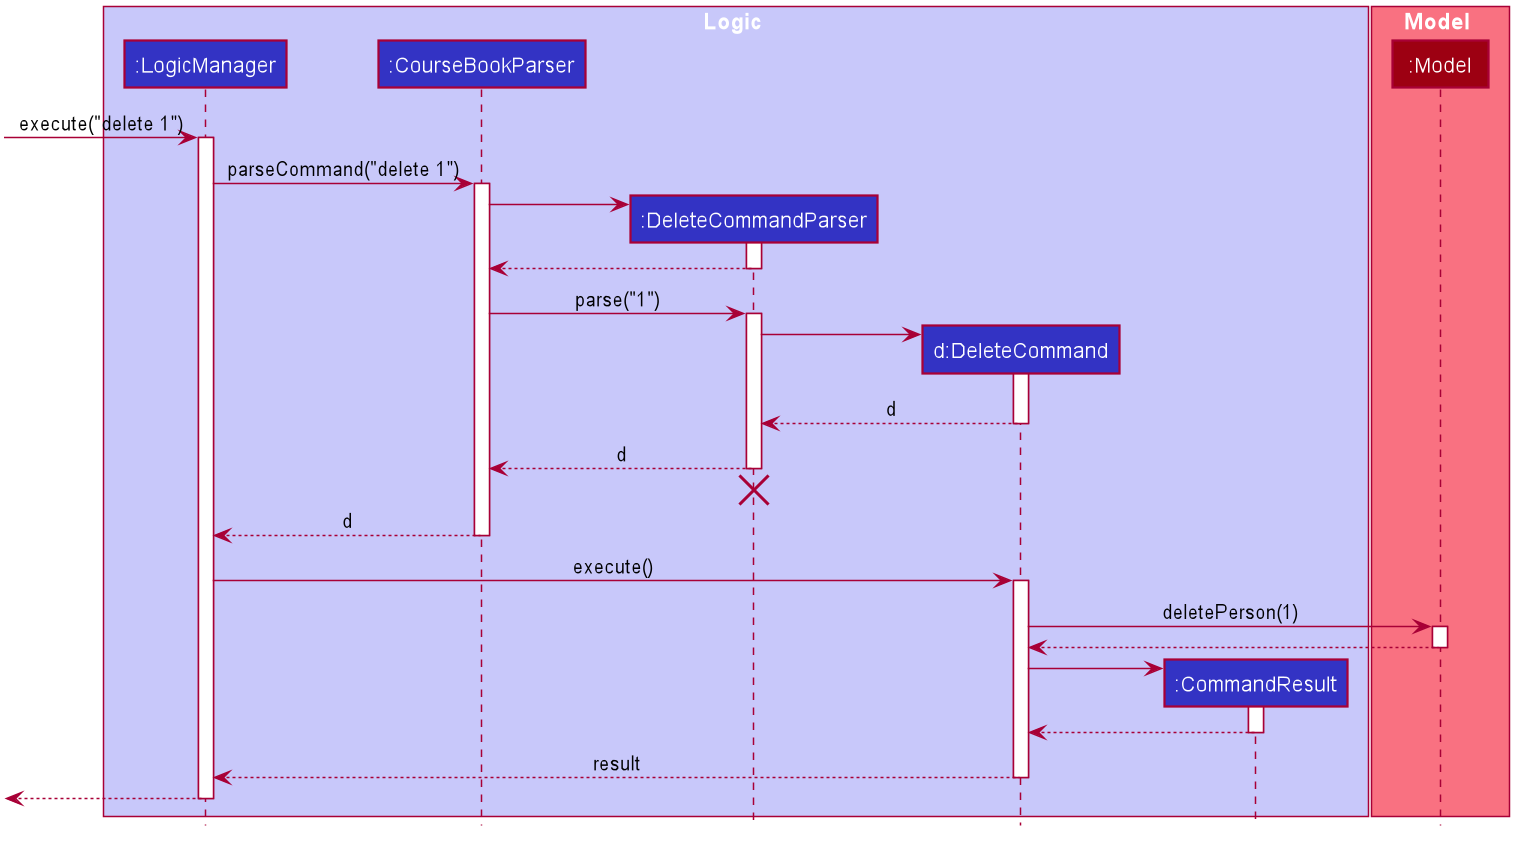
delete 1 Command
The lifeline for ModuleDeleteCommandParser should end at the destroy marker (X) but due to a limitation of PlantUML, the lifeline reaches the end of diagram.
|
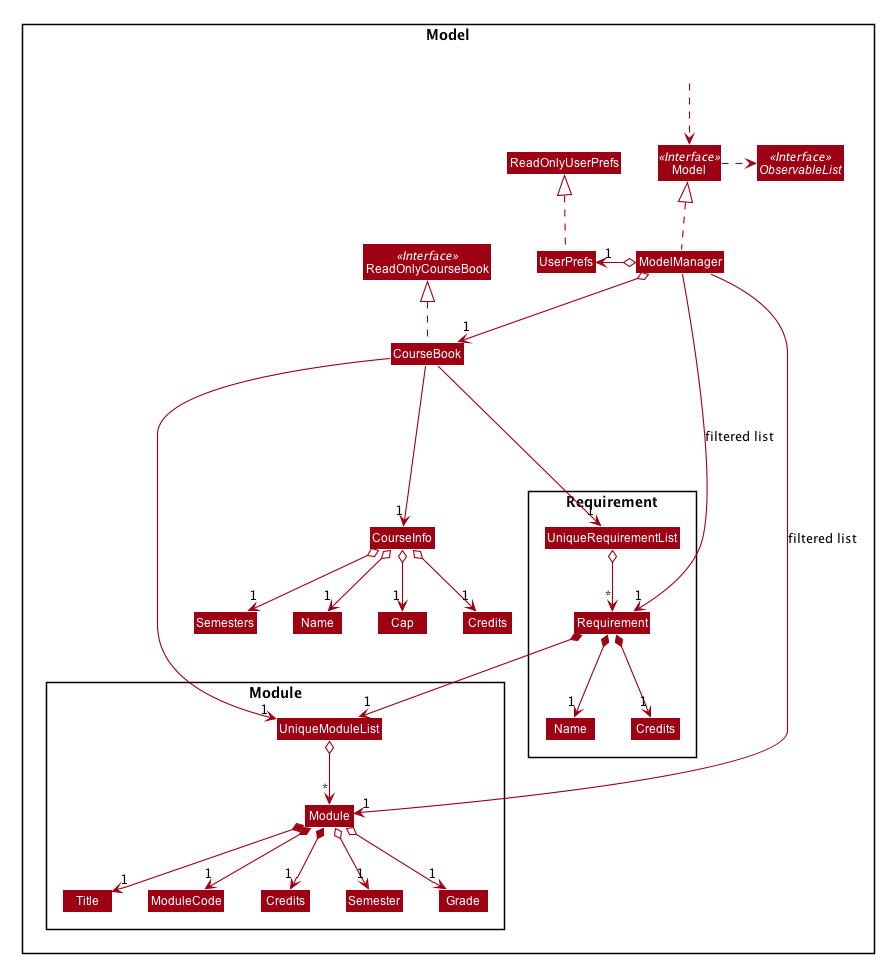
2.4. Model component
API : Model.java
The Model,
-
stores a
UserPrefobject that represents the user’s preferences. -
stores the Course Book data.
-
exposes an unmodifiable
ObservableList<Requirement>that can be 'observed' e.g. the UI can be bound to this list so that the UI automatically updates when the data in the list change. -
exposes an unmodifiable
ObservableList<Module>that can be 'observed'. -
does not depend on any of the other three components.
As a more OOP model, we can store a Tag list in Course Book, which Module can reference.
This would allow Course Book to only require one Tag object per unique Tag, instead of each Module needing their own Tag object.
An example of how such a model may look like is given below.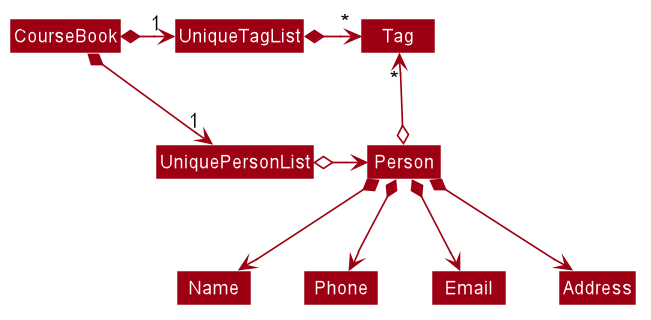
|
2.5. Storage component
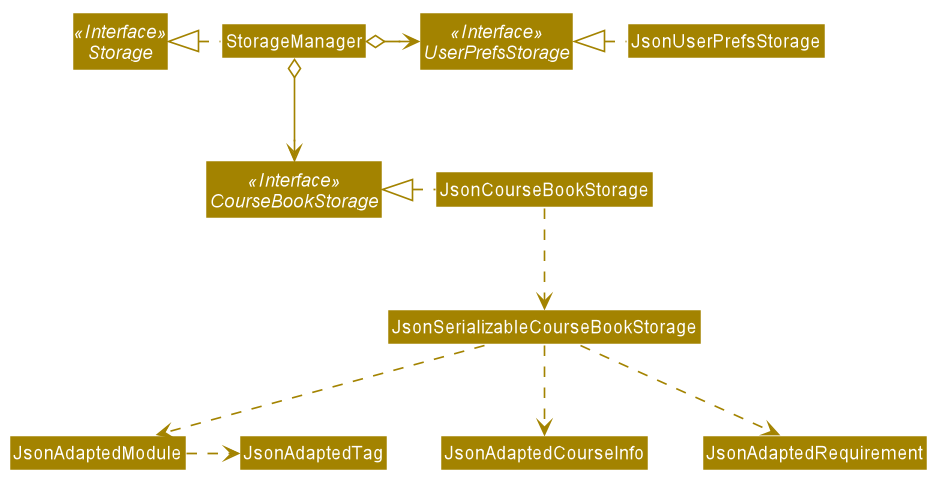
API : Storage.java
The Storage component,
-
can save
UserPrefobjects in json format and read it back. -
can save the Course Book data in json format and read it back.
2.6. Common classes
Classes used by multiple components are in the iGrad.commons package.
3. Implementation
This section describes some noteworthy details on how certain features are implemented.
3.1. Course Feature
Section by: Nathanael Seen
As per the Model diagram above, there is only one CourseBook in the system.
A CourseBook represents all information related to helping a user track her graduation
requirements, including the following:
-
One
UniqueModuleList, consisting of allModulesin the system, which may or may not be mapped to any (degree)Requirement(s) -
One
UniqueRequirementList, consisting of all (degree)Requirements -
One
CourseInfo, representing important information related to a degree course, which would be detailed more in this section
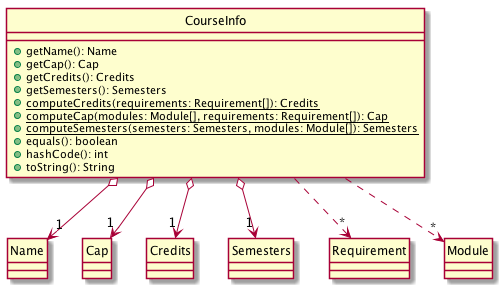
3.1.1. Implementation
Section by: Nathanael Seen
In the implementation of the course feature which 'houses' the various Requirements
and the Modules mapped under those requirements, a CourseInfo class is
necessary in order to represent overall course information, such as the name of the course, the
current cap of the student (or user), the total credits (MCs) fulfilled/required, and
semesters left before she could graduate.
These important information are encapsulated in the CourseInfo class which should only
have one Name, one Cap, one Credits and one Semesters object(s), at any one time:
Also, as per the diagram above, we note that these fields (in a CourseInfo) are optional,
because a user might not even have a course set in the first place. This occurs when the
application is started out in a 'blank' state, with no initial or sample data.
Now, to describe more of this CourseInfo class, its fields, the following two sub-sections would
detail the Credits and Semesters classes and their design.
Thereafter, the next two sub-sections would attempt to explain the mechanics of the two crucial static
methods computeCredits(…) and computeCap(…), which is used
throughout the application.
Finally, the last two sections would be dedicated to elaborating how the various
course commands; course edit and course achieve works.
Credits
Section by: Nathanael Seen
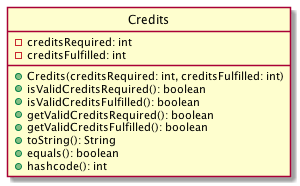
The Credits class maintains 2 integers; creditsRequired and creditsFulfilled, for
storing both the total number of course credits (MCs) required for graduation,
and also the number credits the user has fulfilled thus far, respectively.
Also, it some public validation methods (isValidCreditsFulfilled() and isValidCreditsFulfilled())
which is used in the constructor for constructing a 'valid' Credits object.
The following constraints defines a 'valid' Credits object:
-
creditsRequired> 0 -
creditsFulfilled>= 0
Note that creditsFulfilled can be more than or equals to creditsRequired, as it is
possible that a student 'over-fulfills' the graduation requirements in her course.
The following are some noteworthy details on the Credits class/object:
-
Creditsis recomputed through thecomputeCredits(…)method inCourseInfo(whenever there is a possible change). This newly recomputedCreditsobject would be subsequently updated in theCourseInfo
-
creditsRequiredis recomputed by summing all thecreditsRequiredof the individualRequirementsin theUniqueRequirementList -
creditsFulfilledis recomputed in the same way ascreditsFulfilled -
In the
CourseInfoclass,Creditsis first initialized (to some non-empty value) only when the following conditions have been met:-
The user has already set a course, through the
course setcommand. -
There is at least one
Requirementin theUniqueRequirementList,` by whichcreditsRequiredandcreditsFulfilledcould be re/computed.
-
Semesters
Section by: Teri
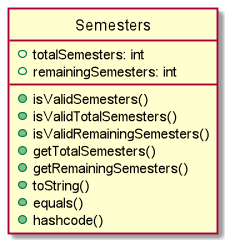
Semesters stores the total semesters and remaining semesters that a user has in the course.
The following are some noteworthy details on the Semesters class/object:
-
Semestersis first initialized when user does commandcourse set.totalSemesterswill be equal toremainingSemestersas user has not entered any other data to indicate completion of semesters. -
Semestersis updated through methodcomputeSemestersinCourseInfo. -
totalSemestersis changed by user through the commandcourse edit. -
remainingSemestersis computed by methodcomputeRemainingSemesters. This method uses themoduleListto check formodulethat hasSemesterandGrade. Themodulewhich fulfils the mentioned and has the latestSemesterwill be taken as the latest completed semester.
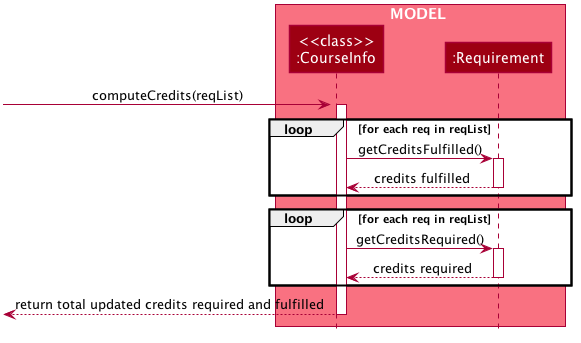
Compute Credits
In this section, we describe how computeCredits(requirement: Requirement[]) works to recompute
the latest Credits.
As previously mentioned, this method is invoked everytime there is a
possible change in the total course Credits.
This might be caused through the following commands:
-
module donewhere aModuleis attributed a grade and marked done. Resultantly, allRequirementsin theUniqueRequirementList, consisting of thatModulewould have to be updated. Also, but most importantly, thecreditsFulfilledattribute of thoseRequirementswould have to be updated, causing an eventual change in the total coursecreditsFulfilledofCredits(inCourseInfo). -
requirement un/assignwhereModule(s)are assigned to that particular requirement, where someModulesmight have already been marked as done and given a grade, hence falling back to the first scenario, wherecreditsFulfilledof a course would have to be updated. -
requirement editwhere thecreditsRequiredattribute of that requirement might be updated, resulting in the need to update the overall coursecreditsRequiredas well -
And many others such as;
requirement add,requirement delete,module edit,module delete
Now, we have specified the possible scenarios where computeCredits(…) might have to be
invoked to update Credits of CourseInfo, however we have not described how it actually works.
As from our previous discussion, we note that creditsFulfilled and
creditsRequired is computed through summing up the creditsFulfilled and creditsRequired
for the individual Requirements.
More formally, the interactions between the various classes, for the computation to be performed are as such:
Compute Cap
Similar to Section 3.1.1.3, “Compute Credits”, Cap has to be updated frequently, each time module information
in coursebook changes, and the computeCap(…) method facilitates the recomputation of the
updated Cap.
The diagram below describes the interactions between the various classes, as the computation is performed:
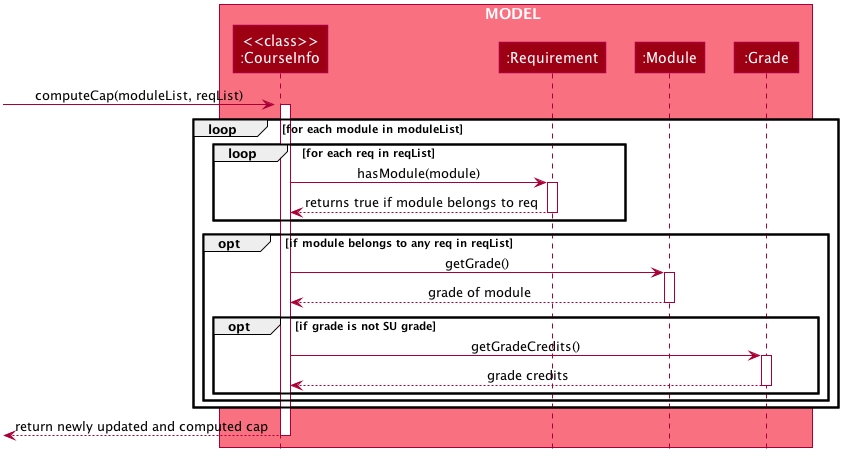
We note that from above, CourseInfo does most of the interfacing with other classes,
and the rest of the classes don’t interact with each another.
In summary, the following steps are performed as computeCap(…) is invoked:
(For each Module in the moduleList):
-
CourseInfofirst iterates throughreqListto determine if aModulebelongs to anyRequirement -
If it does,
CourseInfoagain interfaces withModuleto extract itsGrade. -
Finally,
CourseInfointeracts withGradeto determine if theGradeis a non-SU grade. -
If the
Gradeis non-SU, theModuleis factored into Cap computation.
3.1.2. Course Edit
Section by: Teri
Overview
Users can edit their course info, which are Name and Semesters by using the course edit command.
Implementation
Here is how the courseInfo class updates when name and semesters of course is edited.
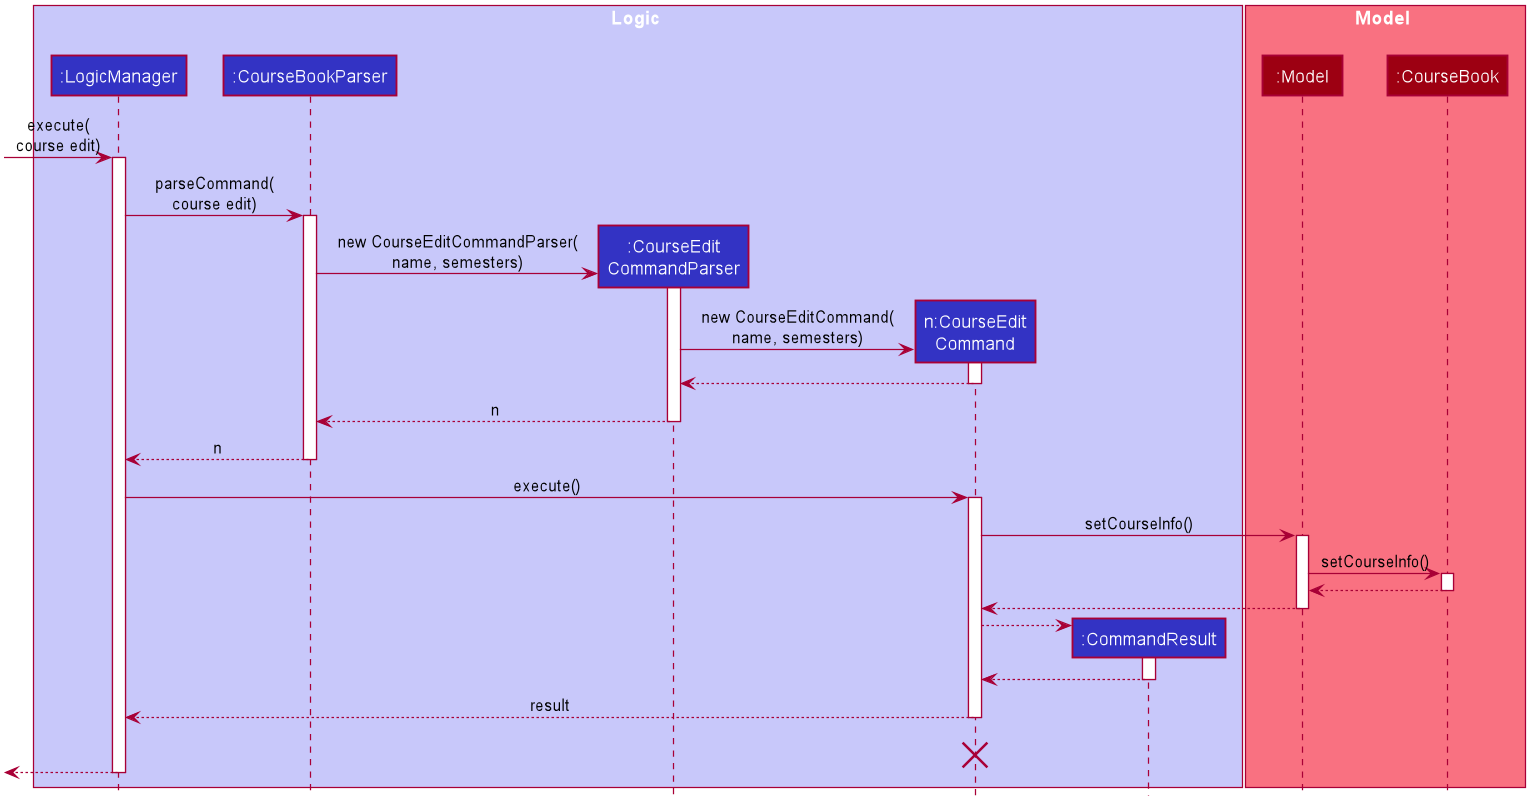
When a user edits a course, the user has to specify the prefix n/ for Name or s/ prefix
for Semesters.
Then the application proceeds to do the following steps:
-
The
CourseEditCommandParseris called to parse theCourseEditCommandwith then/ands/prefix. -
The
CourseEditCommandis executed and callssetCourseInfotoModel. -
Modelcalls the same methodsetCourseInfotoCourseBook. -
The new course
Nameand courseSemestersis set in theCourseBook.
3.1.3. Course Achieve
Section by: Teri
Overview
Users can get an automatic calculation of their desired C.A.P. by using the course achieve command and
entering their desired Cap.
Implementation
The computation of C.A.P. is done through computeEstimatedCap in courseInfo which uses Semesters
and Cap of courseInfo.

When a user wants to calculate achievable C.A.P., the user has to specify the prefix c/ for Cap.
Then the application proceeds to do the following steps:
-
The
CourseAchieveCommandParseris called to parse theCourseAchieveCommandwith thec/prefix. -
The
CourseAchieveCommandis executed and it calls methodgetCourseInfoinModelto getCourseInfo. -
The
CourseAchieveCommandthen proceeds to call methodcomputeEstimatedCapinCourseInfo. -
The
CourseAchieveCommandthen passes the computed result toCommandResult
The below is a detailed description of what happens inside the Model:
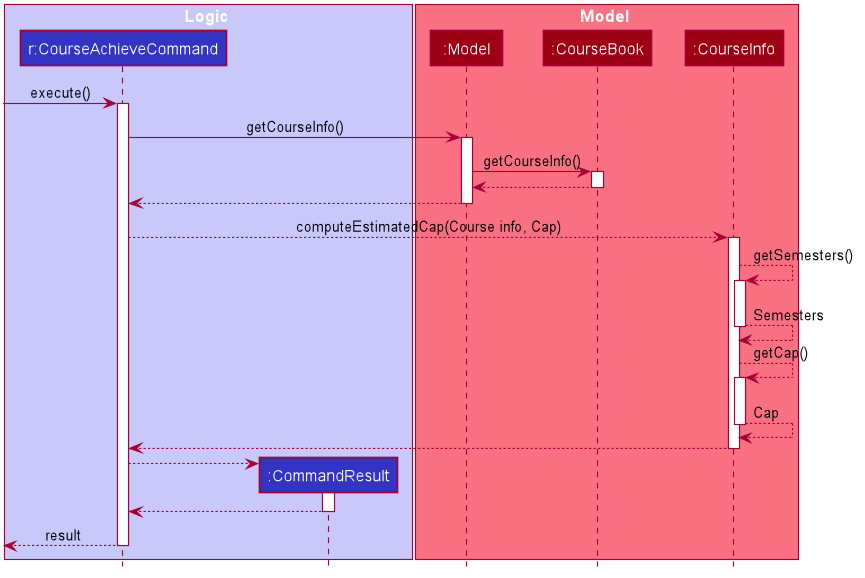
-
After the execute call, the
CourseAchieveCommandcalls methodgetCourseInfoinModel. -
Modelthen calls the same methodgetCourseInfotoCourseBookto retrieveCourseInfo. -
With the
CourseInfoandCap,CourseAchieveCommandcalls methodcomputeEstimatedCapinCourseInfo. -
CourseInfocalls methodgetSemestersandgetCapto itself to get the following information:-
Semesters -
Cap
-
-
computeEstimmatedCapcomputes and returns estimateCap. -
The result is passed back to
CourseAchieveCommand, which passes toCommandResultand eventually returns to the user.
Design Considerations
Invalid and Unachievable C.A.P.
It is possible that a calculated Cap to achieve is not a valid Cap. In such situations, an exception is
thrown within the computeEstimatedCap command and it is caught in the CourseAchieveCommand. User will be
given feedback that the desired C.A.P. is not achievable.
The figure below illustrates this:
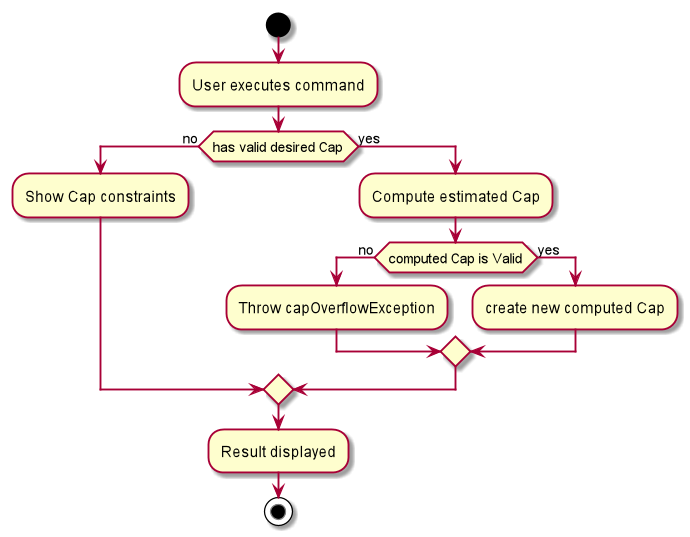
Therefore, there are three types of result displayed to User:
-
When User enters invalid Cap to achieve
-
When computed Cap is invalid
-
When computed Cap is valid
3.2. Module Feature
Section by: Wayne
3.2.1. Module Component
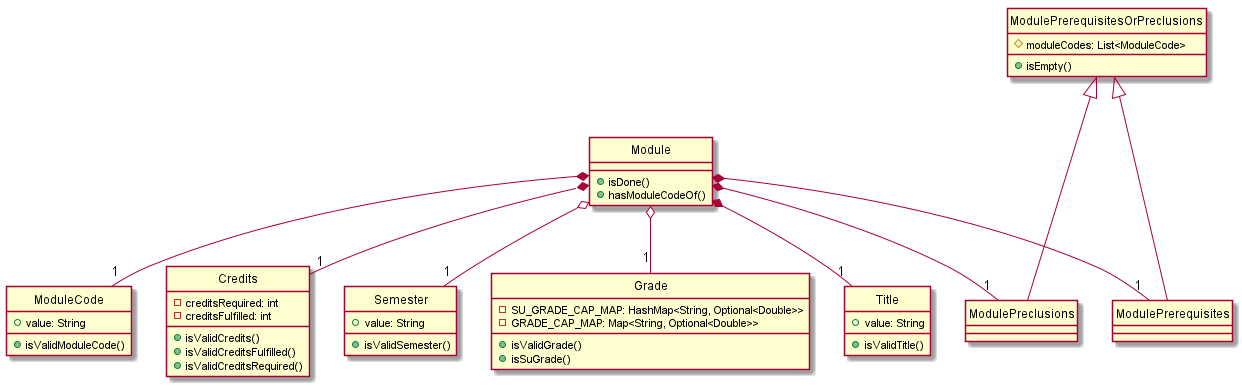
The Module component is the building block of all other components in the system.
In order to track the number of credits left to fulfill
for each requirement, each module is stored in a UniqueModuleList and the credits tied to each
module is then tabulated.
Besides being necessary in tracking the amount of credits left for a requirement, modules are also
used to decide which semester the user is currently in. When a semester is tagged to a module, either when
a new module is added or an existing module is edited, the latest semester of all modules in the filteredList of modules is taken
to be the current semester.
A module must have the following non-optional values:
| Value Type | Class Name | Example |
|---|---|---|
String |
Title |
Software Engineering |
String |
ModuleCode |
CS2103T |
String |
Credits |
4 |
List |
ModulePrerequisites |
CS2030, CS2040 |
List |
ModulePreclusions |
CS2103, CS2103T, CS2113T, CS2113 |
A module may also have the following optional values:
| Value Type | Class Name | Example |
|---|---|---|
String |
Semester |
Y3S1 |
String |
Grade |
A+ |
Figure 21, “Module Class Diagram” illustrates the relation between the various classes:
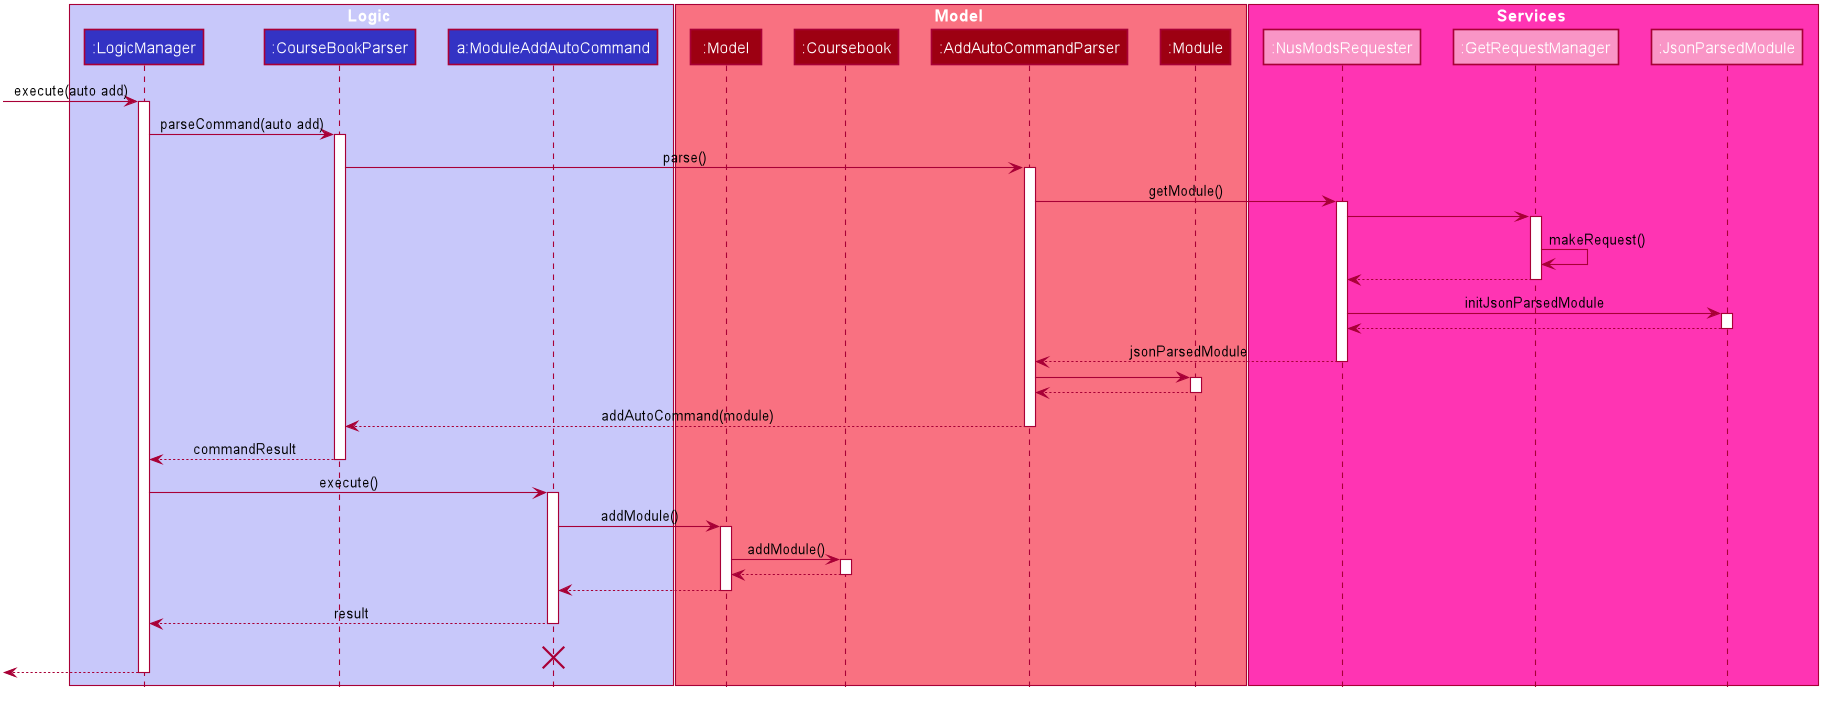
3.2.2. Module Add Auto
Section by: Wayne
Overview
The "automatic" addition of modules allows users to add up to 10 modules at once with all non-optional values filled in.
This is done by making a HTTP GET request to the NUSMods API and fetching the module data
given in a JSON format.
Implementation
The automatic filling in of module details on addition of a new module is facilitated by NusModsRequester.
It creates a new instance of GetRequestManager which it relies on to make a request to the NUSMods API.
Upon receiving a response, it creates an instance of JsonParsedModule.
JsonParsedModule parses the JSON object given in the response of the initial request and stores the following values:
| Value Type | Name | Example |
|---|---|---|
String |
title |
Software Engineering |
String |
moduleCode |
CS2103T |
String |
credits |
4 |
String |
prerequisite |
CS2040C or (CS2030 and (CS2040 or its equivalent)) |
String |
preclusion |
CS2103, CS2103T, (CS2113T for CS2113), (CS2113 for CS2113T) |
Table 1, “JsonParsedModule Table of Values” illustrates the difficulty in parsing prerequisites and preclusions as
the data provided is not in a standard format
|
The created JsonParsedModule object is then converted into a Module object, which is subsequently added
to the courseBook via the method addModule of the ModelManager.
Figure 22, “Module Add Auto Sequence Diagram” illustrates this:
Design Considerations
Most of the design considerations arose as a result of having to make a network request.
A secondary module addition feature
As with all network requests, this feature might not work as intended in certain circumstances. Possible cases are:
-
High Network Congestion
-
Poor Network Connection
-
NUSMods Offline
In such situations, it becomes difficult or impossible to carry out the addition of modules using this command.
Therefore, this feature was built on top of the primary module add feature, ensuring that the user
could still manage to add modules even when faced with the issues as listed above.
The use case for this situation is as follows:
System: iGrad
Use case: UCM1 - Add module via NUSMods
Actor: User, NUSMods
MSS:
-
User wants to add a module.
-
iGrad requires user to specify the module codes.
-
User enters the module codes corresponding to the modules he wishes to add.
-
iGrad sends a request to NUSMods.
-
NUSMods responds with the requested data.
-
iGrad adds the module to the module list.
-
User views the module in the module list.
Use case ends.
Extensions:
5a. NUSMods does not respond with the requested data.
5a1. User adds module manually
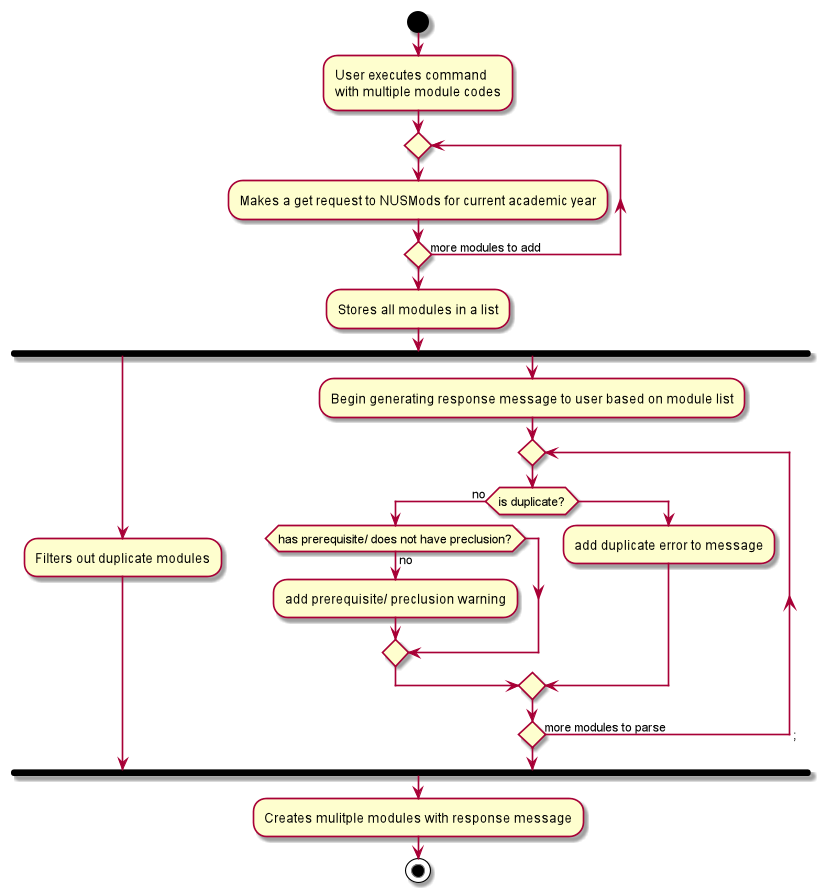
Messages for individual modules
As this feature allows a user to add modules by batches, it is possible that one or more modules in
the batch are invalid or require warning messages. In order to facilitate this, the processing of the list of modules and the
generation of error and warning messages were done in parallel. This was because if the list of modules was processed first,
modules with issues would be filtered out without notice, leading to a confusing user experience.
Improving the user experience [PROPOSED]
Due to network latency - the Round Trip Time taken from when a request is made to when a response is received - the user might experience a situation where it appears that the application has stopped working.
For a large batch of modules, the application might also display a not responding label in the toolbar.
In order to improve the user experience, it is ideal that a loader be displayed when waiting for the response from the server.
However, due to time constraints, this was not implemented.
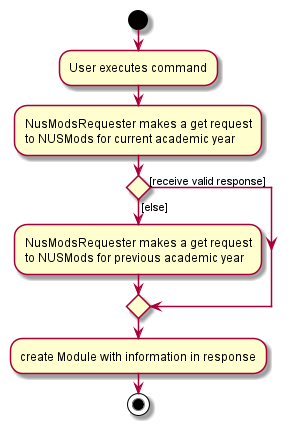
Getting the latest data [DEPRECATED]
Past iterations of this feature made a maximum of two requests for one module. The first request would
attempt to get the module for the current academic year, whilst the second request attempted to get
the module for the previous academic year, in the event the module for the current academic year was not available.
This process is illustrated in Figure 25, “Previous implementation of Module Add Auto”. However, it was decided that the benefits of making a maximum of one request outweighed that of getting the latest module information and thus, currently only one request is made.
3.2.3. Module Filter
Overview
The average number of modules a student has for a 4 year program in NUS is 40. The application window, however, can display
a maximum of 9 modules for a 17" screen and considerably less for smaller displays. As a result, it is imperative that users have
a way to filter modules so that only what is required is displayed.
Implementation
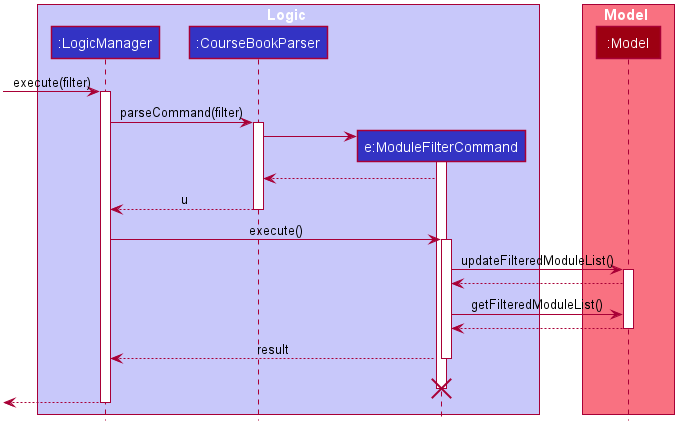
The filtering of modules is done by calling the execute function of ModuleFilterCommand.ModuleFilterCommand takes in
optional parameters Semester, Credits, Grade and an operator, which could be AND or OR. The ModuleFilterCommand then
calls updateFilteredModuleList on the Model such that the Model updates the filteredList based on the predicates provided.
The ModuleFilterCommand then calls getFilteredModuleList() to check if the filter was applied successfully.
The matching is done by the functions checkSemesterMatch(Module m), checkCreditsMatch(Module m) and checkGradeMatch(Module m). Unlike
the other two functions, checkCreditsMatch(Module m) does not check if the actual credits for a module is present since the
credits field in a module is compulsory.
The AND operator specifies that the provided parameters be chained with the logical and operator.
The OR operator specifies that provided parameters be chained with the logical or operator.
When the filter command is issued, the Model updates the module list based on the predicate given. Figure 26, “Module Filter Sequence Diagram”
illustrates this sequence of events:
Design Considerations
Resetting the state
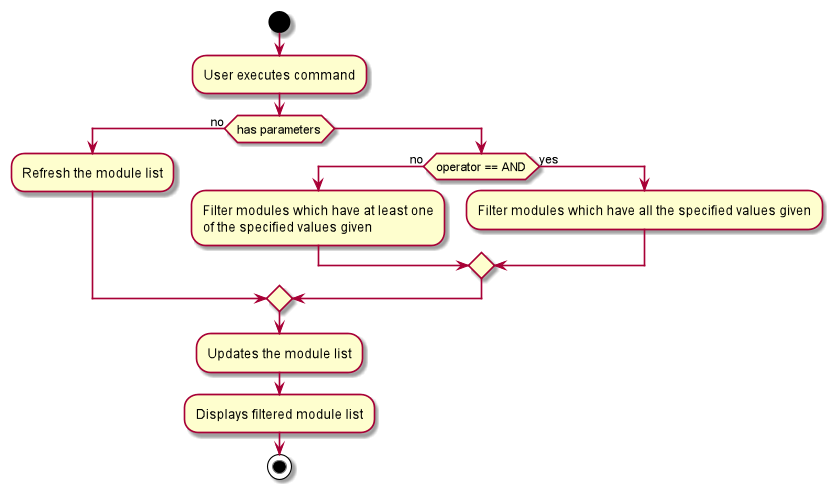
When this command is issued, the modules that do not match the predicate given will disappear from the module list. It is thus necessary to allow the user to issue a new command in order to view all the modules again.
Whilst creating a new command such as module reset was proposed, it was decided that a new command would only serve to
make the user experience more complicated than it should be.
Therefore, an allowance was made for module filter to reset the state when receiving no parameters, a divergence from
the way other functions handled the situation of empty parameters.
Figure 27, “Module Filter Activity Diagram” illustrates this clearly:
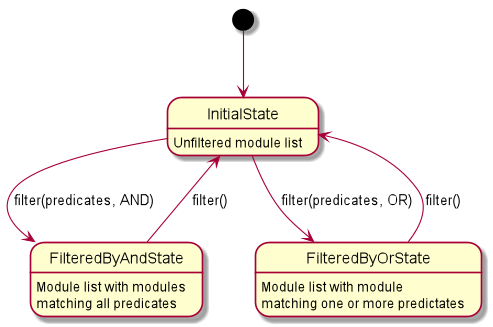
The filteredList of modules therefore takes three general states (see Figure 28, “Module Filter State Diagram”):
-
Initial State
The
modulelist is unfiltered. Allmodulesare displayed. -
Filtered by
ANDStateThe
modulelist is filtered by a predicate composed of the provided parameters chained together with the logical and operator -
Filtered by
ORStateThe
modulelist is filtered by a predicate composed of the provided parameters chained together with the logical or operator
Displaying Filter State [PROPOSED]
An issue with the filtering of modules is that when the current state is not obvious, the user might lose track of what the module list is filtering on. To solve this problem, it would be an improvement to display the current state prominently to the user.
3.2.4. Module Done
Section by: Nathanael Seen
Overview
This feature enables students to mark a module which they have completed with a certain grade. Once a module is marked 'done', it would be counted to graduation requirements.
Implementation
Trivial as it might seem, there are actually quite a number of coursebook data which needs to
be updated when a module is marked 'done'.
This includes the Module itself, the various Requirements in the UniqueRequirementList,
and the CourseInfo.
The following diagram illustrates this:
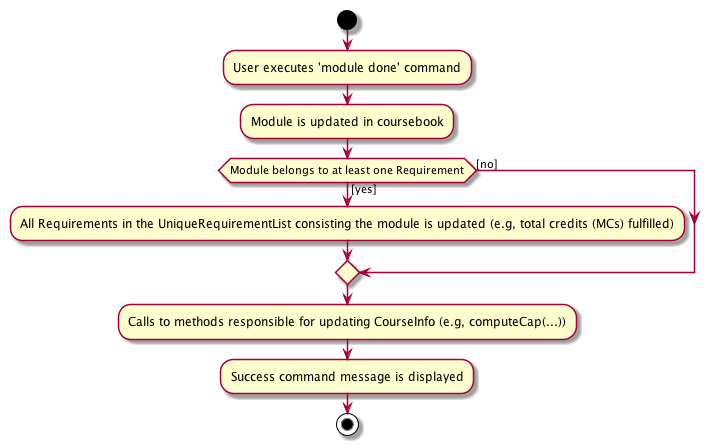
As from the above, there are two possible scenarios; either a Module belongs to at least one
Requirement or that it does not belong to any Requirement.
In the latter case, calls to methods which update CourseInfo would be immediately invoked,
bypassing the updating of the Requirement(s).
3.3. Requirement Feature
Section by: Yijie
The Requirement feature bridges the connection between a Module and a Course. A Requirement represents
a category with a set amount of modular credits needed to be fulfilled in order to graduate. By
adding modules to a Requirement, these modules are tracked under the modular credits needed to fulfill
the Requirement, as well as the total modular credits needed to fulfill the Course.
Multiple requirements can exist in a Course. When all requirements have been fulfilled,
we indicate that the Course has been completed.
3.3.1. Implementation
Section by: Yijie
The Requirement component contains 4 sub-components: RequirementCode, Title, Credits and UniqueModuleList.
All four sub-components are compulsory and must always be specified in a Requirement. The properties of these four
sub-components are specified in the table below:
| Class Name | Properties | Example |
|---|---|---|
|
The unique identifier of a requirement. Implemented to allow users to easily specify the requirement they want to modify or remove. See Requirement Code Design Considerations. |
CSF0 |
|
The title of a requirement. Does not have to be unique. |
Computer Science Foundation |
|
The credits of a requirement, |
40 |
|
The list of modules assigned to a requirement. |
List containing modules CS1101S, CS2101, CS2103T |
When a Module is added to a Requirement, the UniqueModuleList is updated with the new Module.
At the same time, the creditsAssigned property of the Credits class also updates accordingly. If
the Module is completed, the creditsFulfilled property of Credits also updates to add the
credits of the Module. For example, if a module with 4 modular credits was marked as done and assigned
to a Requirement, creditsAssigned and creditsFulfilled would both increase by 4.
The class diagram below illustrates the relationship between Requirement components.
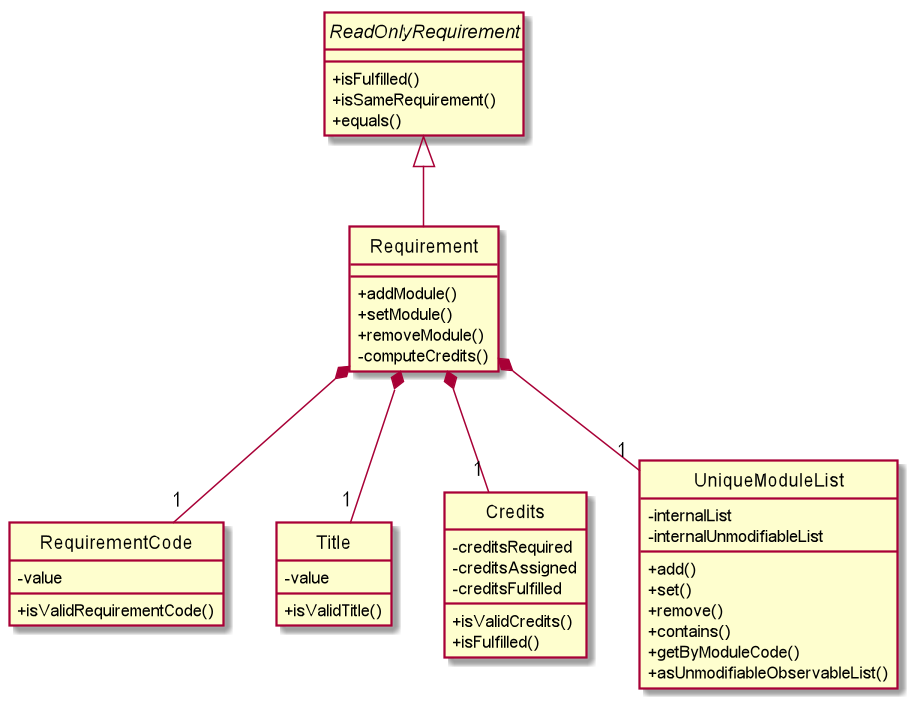
Requirement commands that are available are:
-
requirement add- adds a new requirement to the course book -
requirement edit- edits an existing requirement in the course book -
requirement delete- deletes an existing requirement from the course book -
requirement assign- assigns module(s) to the requirement
3.3.2. Requirement Add
Section by: Yijie
Overview
The requirement add command adds a Requirement to the Course. The Credits information held by the Course
is updated to reflect the total modular credits required to complete the course.
Implementation
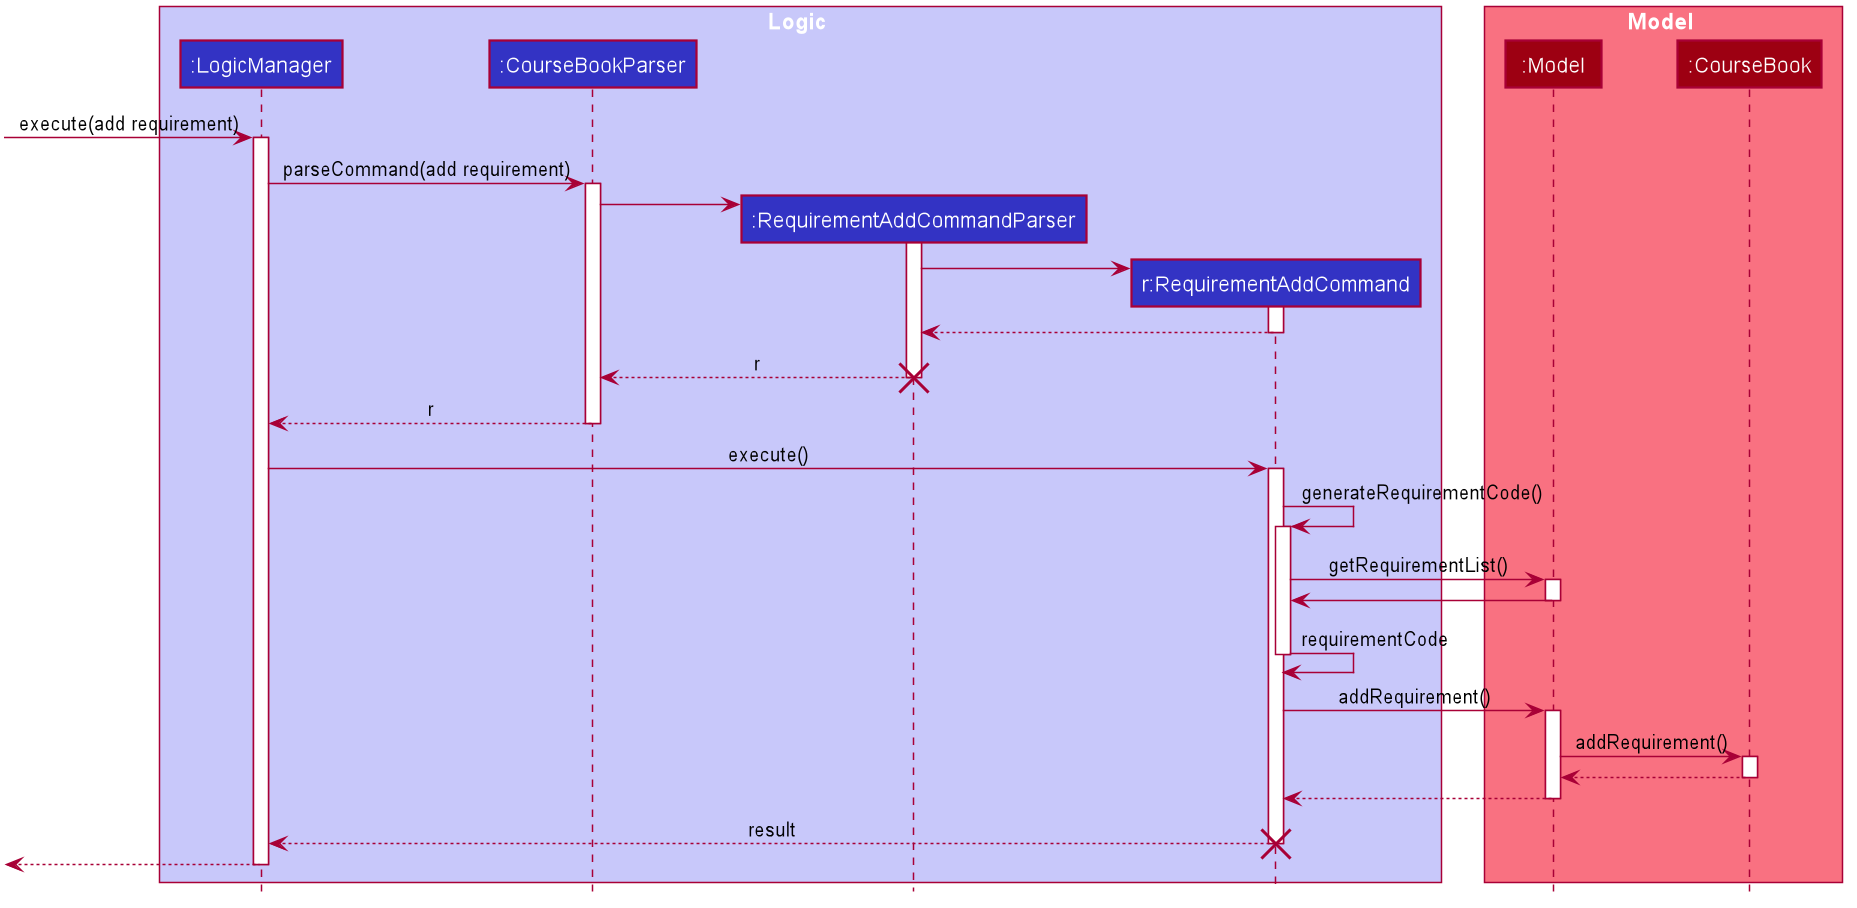
When a user enters a requirement add command, the parameters specified by the user, i.e. the requirement title
and the requirement credits required to fulfill the Requirement, are passed to the LogicManager,
CourseBookParser and subsequently into the RequirementAddCommandParser where the parameters are extracted
and parsed into Title and Credits objects.
The RequirementCode is generated at this stage by using the first letter of every word in the
title parameter passed in, upper-cased. For example, if the title provided is "Computer Science Foundation",
the RequirementCode generated would be CSF. Similarly, if the title provided is "3Computer Science 4Foundation",
the RequirementCode generated would still be CSF because non-alphabets in the title are ignored.
The parsed Title, Credits and the generated RequirementCode are used to create a RequirementAddCommand object,
which is later executed by the LogicManager, as shown in the
Requirement Add Sequence Diagram below.
When the command is executed by the LogicManager, the new Requirement is created and
stored in the CourseBook through the Model.
Design Considerations
Requirement Code
Originally, we chose to use the requirement Title as the unique identifier for requirements, which means that
specifying a Requirement to be modified or deleted would be handled by entering the Title. However, we realised
that that was a big deterrent in users staying on our application in the long run. The reason is because requirement
titles are generally long, and often require more than one word to be expressed. For example, typing "Computer
Science Foundation" or "Computer Science Breadth and Depth" every time a module was to be assigned to a requirement
would require a relatively long time, and would violate our Non-Functional Requirement
of providing users with an application which can be navigated quickly through typing.
Hence, we chose the design of providing users with a RequirementCode, the unique identifier which allows
users to quickly access the Requirement they want to modify or delete.
In order to make the RequirementCode strictly unique, further parsing is performed on the RequirementCode
generated by the RequirementAddCommandParser. When the RequirementAddCommand is executed by the LogicManager,
a new RequirementCode is generated, as shown in the
Requirement Add Sequence Diagram, by appending an integer to the back of
the original RequirementCode. This is necessary as multiple requirements with the same starting alphabets
may exist, so we need to allow users to differentiate amongst such requirements. Furthermore, users are also
allowed to add requirements with the same Title to enhance the flexibility of adding requirements, so the
RequirementCode also allows users to differentiate amongst these requirements.
The use case for adding a requirement is as follows:
System: iGrad
Use case: UCR1 - Add requirement
Actor: User
MSS:
-
User requests to add a requirement.
-
iGrad requires user to enter a requirement title and credits.
-
User enters the title and credits.
-
iGrad creates the requirement.
-
Use case ends.
Extensions:
3a. The requirement title is not provided.
3a1. iGrad prompts user for requirement title.
3a2. User enters a requirement title.
Steps 3a1-3a2 are repeated until a valid requirement title is provided.
Use case resumes at step 4.
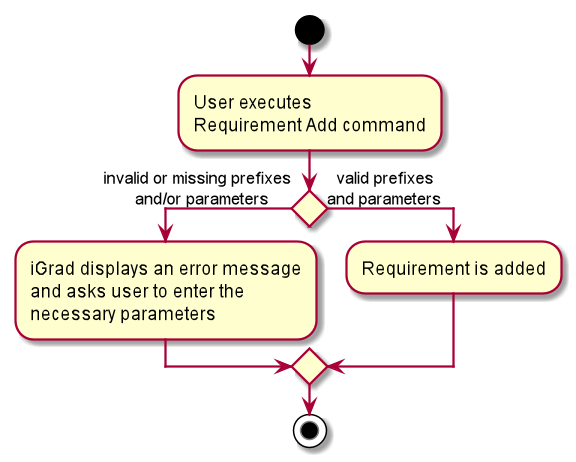
Below displays the activity diagram for adding a requirement.
3.3.3. Requirement Assign
Section by: Nathanael Seen
Overview
This feature allows Module(s) to be assigned or mapped under a Requirement.
Implementation
We note that as like the module done command, a few pieces of information in the
coursebook would have to be updated.
The command-parsing-execute mechanism is largely similar to requirement add the above, however,
we would like to focus more on the activities (such as validations, etc) that happens
at the Model side.
The following diagram details this:
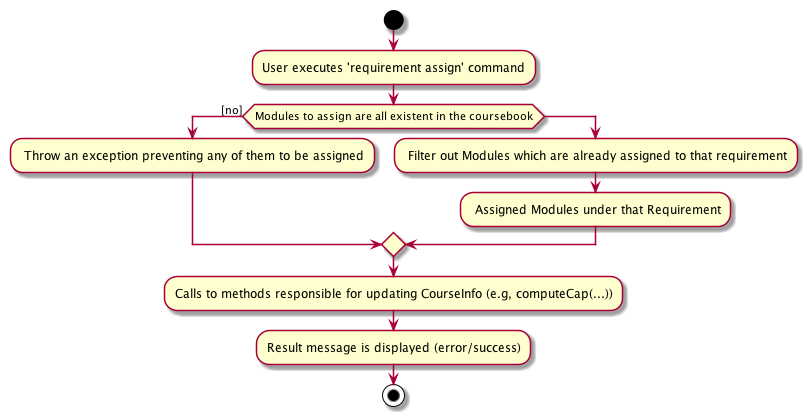
Hence as per the diagram, we observe that modules are assigned to a Requirement
on the following two conditions:
-
All
Modulesto assign are existent in thecoursebook(more specifically, theUniqueModuleList) -
Moduleshave not already been previously assigned to thatRequirement
3.4. Export Feature
Section by: Wayne
3.4.1. Overview
The export feature allows the user to export their data into a .csv file.
3.4.2. Implementation
The export feature is facilitated by the CsvWriter. The ExportCommand calls exportModuleList() on ModelManager,
which then performs a filter on the filteredList of modules in order to filter out all modules where the Optional<Semester> object
isEmpty().
The ModelManager allows for write() to be called on CsvWriter only if the filteredList has at least one module.
Figure 34, “Export Sequence Diagram” shows the process of exporting modules with semesters:
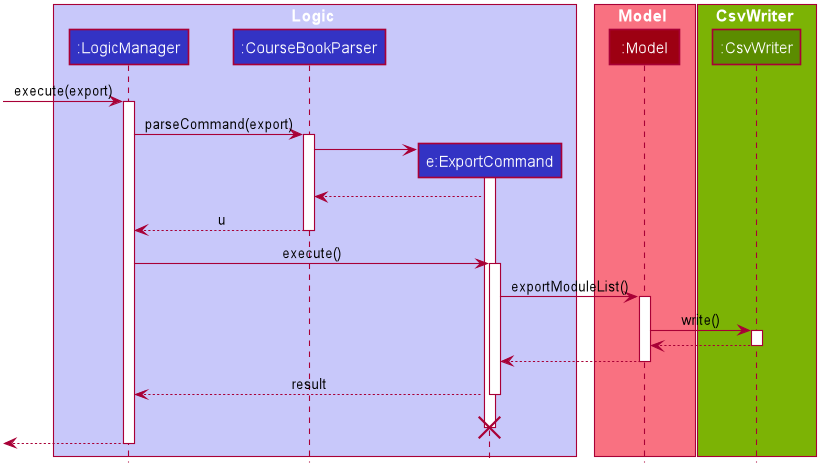
Once the CsvWriter returns from write(), a file titled study_plan.csv will be created in the top-level directory.
The top-level directory has two states concerning the generated file (see Figure 35, “Export State Diagram”):
-
Empty State
-
does not contain the file study_plan.csv
-
-
Non-empty State
-
contains the file study_plan.csv
-

As seen in the figure, it is only possible to revert the state i.e. from Non-empty State to Empty State, by externally deleting the file.
Additionally, if export is issued when there is an existing study_plan.csv, the current file will be overwritten.
3.4.3. Design Considerations
Writing and Reading Issues
It is possible that the user has the study_plan.csv file open while attempting to export data. The only known solution is for the user to close the file and issuing the command again.
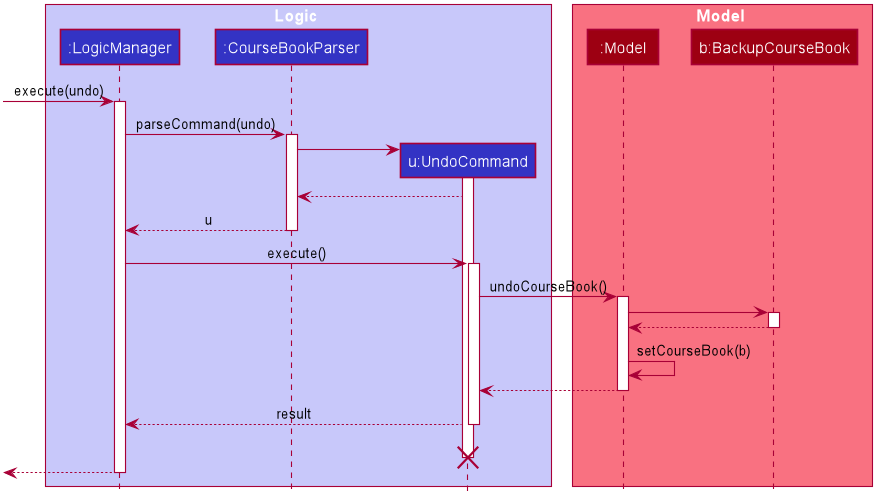
3.5. Undo Feature
Section by: Wayne
3.5.1. Overview
The undo feature allows for the prior state of a courseBook to be saved and loaded from when needed.
3.5.2. Implementation
The undo mechanism is facilitated by the ModelManager and the LogicManager.
The function saveCourseBook(), which composes the storage object, is used to save the previous state of the coursebook
in the file backup_coursebook.json when a new command is executed.
The function undoCourseBook(), implemented by the ModelManager, reads from the file backup_coursebook.json and restores
the data by calling setCourseBook()
Given below is an example usage scenario and how the undo mechanism behaves at each step:
Step 1. The user starts up the application.

Step 2. The user issues the command module delete CS2103T. The previous state of the course book is stored into the file
at backup_coursebook.json by saveCourseBook(). This state still contains the module CS2103T.
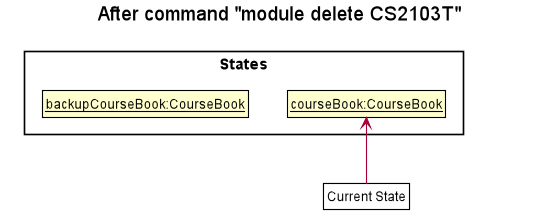
When the undo command is executed, the state of the courseBook is not saved.
|
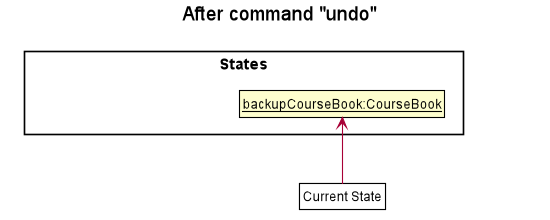
Step 3. The user issues the command undo. The file at backup_coursebook.json is read from and loaded as the main courseBook
to be read from.
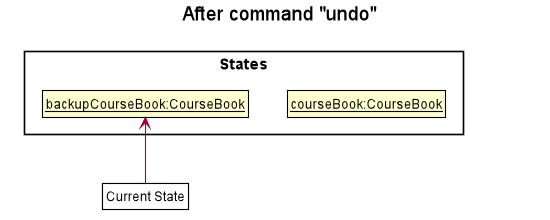
Step 4. The backupCourseBook becomes the main courseBook and another instance of courseBook will be created as its
backup if another command is issued.
The following sequence diagram shows how the undo operation works:
3.5.3. Design Considerations
How undo executes
-
Option 1 (current choice): Saves the entire course book.
-
Pros: Easy to implement.
-
Cons: May have performance issues in terms of memory usage.
-
-
Option 2: Individual command knows how to undo/]] by itself.
-
Pros: Will use less memory (e.g. for
delete, just save the module being deleted). -
Cons: We must ensure that the implementation of each individual command are correct.
-
| While it is recognised that Option 1 may have performance issues in terms of memory, the actual implementation of the feature is unlikely to cause any memory issues. This is due to the fact that modules, requirements and other data users would require are limited to a degree which will not require large memory allocation. |
3.6. [Proposed] Data Encryption
{Explain here how the data encryption feature will be implemented}
3.7. Logging
We are using java.util.logging package for logging.
The LogsCenter class is used to manage the logging levels and logging destinations.
-
The logging level can be controlled using the
logLevelsetting in the configuration file (See Section 3.8, “Configuration”) -
The
Loggerfor a class can be obtained usingLogsCenter.getLogger(Class)which will log messages according to the specified logging level -
Currently log messages are output through:
Consoleand to a.logfile.
Logging Levels
-
SEVERE: Critical problem detected which may possibly cause the termination of the application -
WARNING: Can continue, but with caution -
INFO: Information showing the noteworthy actions by the App -
FINE: Details that is not usually noteworthy but may be useful in debugging e.g. print the actual list instead of just its size
3.8. Configuration
Certain properties of the application can be controlled (e.g user prefs file location, logging level) through the configuration file (default: config.json).
4. Documentation
Refer to the guide here.
5. Testing
Refer to the guide here.
6. Dev Ops
Refer to the guide here.
Appendix A: Product Scope
Target user profile:
-
is a NUS undergraduate
-
prefers desktop apps over other types
-
can type fast
-
prefers typing over mouse input
-
is reasonably comfortable using CLI apps
Value proposition: convenient course requirements tracker for NUS undergraduates
Appendix B: User Stories
Priorities:
-
High (must have) -
* * * -
Medium (nice to have) -
* * -
Low (unlikely to have) -
*
| Priority | As a … | I want to … | So that I can … |
|---|---|---|---|
|
first-time user |
create a course |
|
|
student |
create a graduation requirement |
|
|
student |
input modules under a graduation requirement |
keep track of when a graduation requirement is fulfilled |
|
careless user |
change the graduation requirements which I assigned to a course |
amend any mistakes made when entering data |
|
fickle user |
change the modules which I assigned to a graduation requirement |
change my study plan |
|
fickle user |
have the option to defer adding modules to a graduation requirement |
delay making up my mind on which modules I wish to take |
|
basic user |
see information regarding the course I created, including graduation requirements, modules and gaps (e.g. modules that are unassigned) that need to be filled |
|
|
user |
see the latest updated information about any module |
make informed decisions |
|
basic user |
mark when a module is completed |
|
|
basic user |
input the grades of a module |
|
|
basic user |
retrieve my CAP of any semester at a command |
stay updated about my results |
|
user |
input my desired CAP and have the program calculate what grades I need to achieve |
find out how well I need to do in following semesters |
|
user |
group modules by graduation requirement |
view by requirement |
|
user |
group modules by semester |
view by semester |
|
user who wants to take notes |
record notes for each module |
record why I took it |
|
picky user |
customize display settings |
customize to my needs |
|
advanced command line user |
use familiar linux commands |
navigate more easily |
{All user stories can be viewed from our wiki page and from our issues tracker.}
Appendix C: Use Cases
Section by: Yijie
(For all use cases below, the System is iGrad and the Actor is the user, unless specified otherwise.)
Use case: U01 - Create Course
MSS:
-
iGrad starts up.
-
User requests to create a course.
-
iGrad creates the course.
Use case ends.
Extensions:
-
2a. The course name is not provided.
-
2a1. iGrad prompts user for course name.
-
2a2. User enters a course name.
Steps 2a1-2a2 are repeated until the a non-empty course name is provided.
Use case resumes at step 3.
-
Use case: U02 - Create Requirement
MSS:
-
User requests to create a course.
-
iGrad creates course (UC01).
-
User requests to create a requirement.
-
iGrad creates the requirement.
Use case ends.
Extensions:
-
3a. The requirement title is not provided.
-
3a1. iGrad prompts user for requirement title.
-
3a2. User enters a requirement title.
Steps 3a1-3a2 are repeated until the a non-empty requirement title is provided.
Use case resumes at step 4.
-
Use case: U03 - Create Module
MSS:
-
User requests to create a module by providing a module code.
-
iGrad creates the module with its data pulled from NUSMods.
Use case ends.
Extensions:
-
1a. Module data fails to get pulled due to network error.
-
1a1. iGrad takes from its local module data copy.
Use case ends.
-
-
1b. Module data does not exist on NUSMods.
-
1b1. iGrad creates a empty module with only the module code.
Use case ends.
-
Use case: U04 - Assign Module to Requirement
MSS:
-
User requests to assign a module to a requirement by specifying its module code.
-
iGrad assigns module to requirement.
Use case ends.
Extensions:
-
1a. Module does not exist in system.
-
1a1. iGrad creates the module (UC03).
Use case resumes at step 2.
-
-
1b. Module has already been assigned to the requirement.
-
1b1. iGrad generates a warning and stops the assignment.
Use case ends.
-
7. Non Functional Requirements
-
Should work on any mainstream OS as long as it has Java
11or above installed. -
Should be able to hold up to 100 modules without a noticeable sluggishness in performance (i.e. should take less than 1 second to load)
-
A user with above 70 wpm typing speed for regular English text (i.e. not code, not system admin commands) should be able to accomplish most of the tasks faster using commands than using the mouse.
-
The interface should be intuitive enough such that a user who has never seen the user guide is able to use the basic features.
{More to be added}
Appendix D: Glossary
- Mainstream OS
-
Windows, Linux, Unix, OS-X
- Private contact detail
-
A contact detail that is not meant to be shared with others
Appendix E: Instructions for Manual Testing
Given below are instructions to test the app manually.
| These instructions only provide a starting point for testers to work on; testers are expected to do more exploratory testing. |
E.1. Launch and Shutdown
-
Initial launch
-
Download the jar file and copy into an empty folder
-
Double-click the jar file
Expected: Shows the GUI with a set of sample contacts. The window size may not be optimum.
-
-
Saving window preferences
-
Resize the window to an optimum size. Move the window to a different location. Close the window.
-
Re-launch the app by double-clicking the jar file.
Expected: The most recent window size and location is retained. { more test cases … }
-
E.2. Deleting a module
-
Deleting a module while all modules are listed
-
Prerequisites: List all modules using the
listcommand. Multiple modules in the list. -
Test case:
delete 1
Expected: First module is deleted from the list. Details of the deleted module shown in the status message. Timestamp in the status bar is updated. -
Test case:
delete 0
Expected: No module is deleted. Error details shown in the status message. Status bar remains the same. -
Other incorrect delete commands to try:
delete,delete x(where x is larger than the list size) {give more}
Expected: Similar to previous.
-
E.3. Saving data
-
Dealing with missing/corrupted data files
-
{explain how to simulate a missing/corrupted file and the expected behavior}
-