Overview
iGrad is a desktop module management and graduation tracking application. The user interacts with it using a CLI, and it has a GUI created with JavaFX, FXML and CSS.
Summary of contributions
-
Major Enhancement: added backend to frontend functionality
-
What it does: allows for visible change on the GUI upon user input.
-
Justification: This feature allows the user to view data that they have input into the system, such that they are able to view their data in a cohesive window.
-
Highlights: This feature was done mainly by adding and refactoring existing code from AB3.
-
-
Major Enhancement: added and designed a clean and user-friendly Graphical User Interface (GUI)
-
What it does: improves user experience greatly.
-
Justification: Greatly improves usability by ensuring that the user experience is good when using the application.
-
Highlights: Did up initial mock-ups on Photoshop as well as revamping the initial from AB3 to provide a template for the current UI. Also did up initial skeletons for various UI components.
-
Credits: Skeleton code for multiple GUI components before handing over to Wayne for future iterations.
-
-
Major Enhancement: added module validation when adding from NUSMods.
-
What it does: added modules are validated to check if prerequisites or preclusions already exist in the current data.
-
Justification: Important to ensure that modules added do not clash for the user, which may affect module planning.
-
Credits: Adding modules based on NUSMods data functionality by Wayne, further improvements also by Wayne.
-
-
Minor Enhancement: added multiple JUnit tests in testing the code.
-
Minor Enhancement: did mock-ups and image designs for the interface, using Photoshop.
-
Code contributed: [All commits] [Project Code Dashboard]
-
Other contributions:
-
Project Presentation
-
Was part of the team that did the product pitch
-
-
Contributions to the User Guide
Given below are the sections I contributed to the User Guide. They showcase my ability to communicate with end-users of the product in question. Worked in conjunction with Teri. |
Walkthrough
This segment details a simple tutorial on how to use the application. It provides a step-by-step guide on how to utilise the main components of the application, and covers the following:
-
Choosing an
Avatar -
Adding a
Course -
Adding a course
Requirement -
Adding a
Module -
Assigning a
Moduleto aRequirement -
Adding additional details to a
Module -
Marking as
Moduleas done and assigning aGradeto it -
Tracking your academic progress:
MCsandCAP -
Exporting your data
Here is a 10-step guide on how to use iGrad.
Start up the application
Section by: Daryl
-
Open up the application by opening the
iGrad.jarfile. -
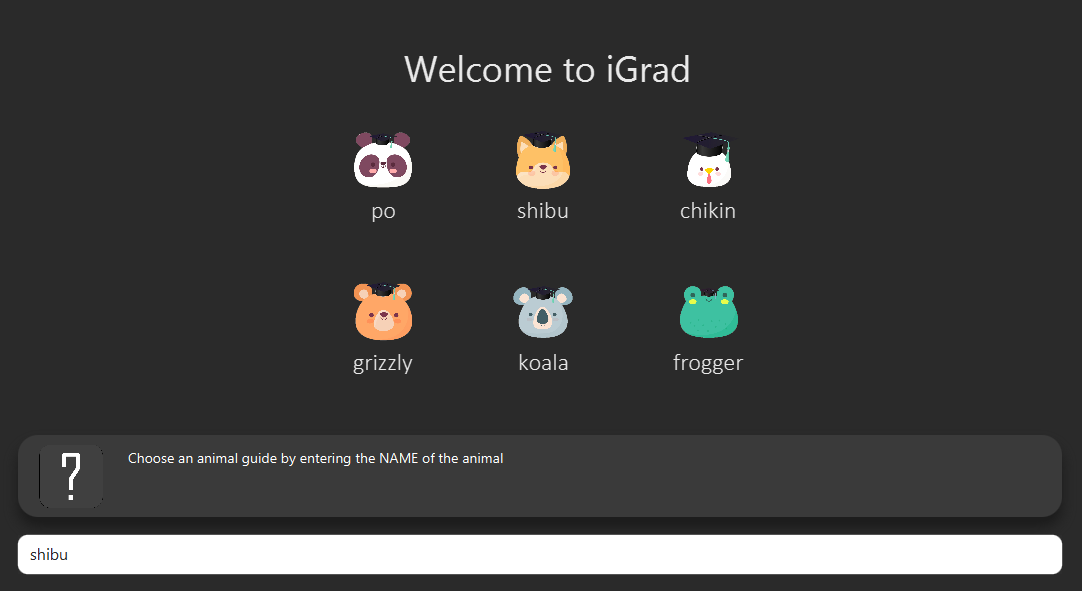
Select an avatar by typing its name before pressing enter.
-
The avatar will act as your guide for the application.
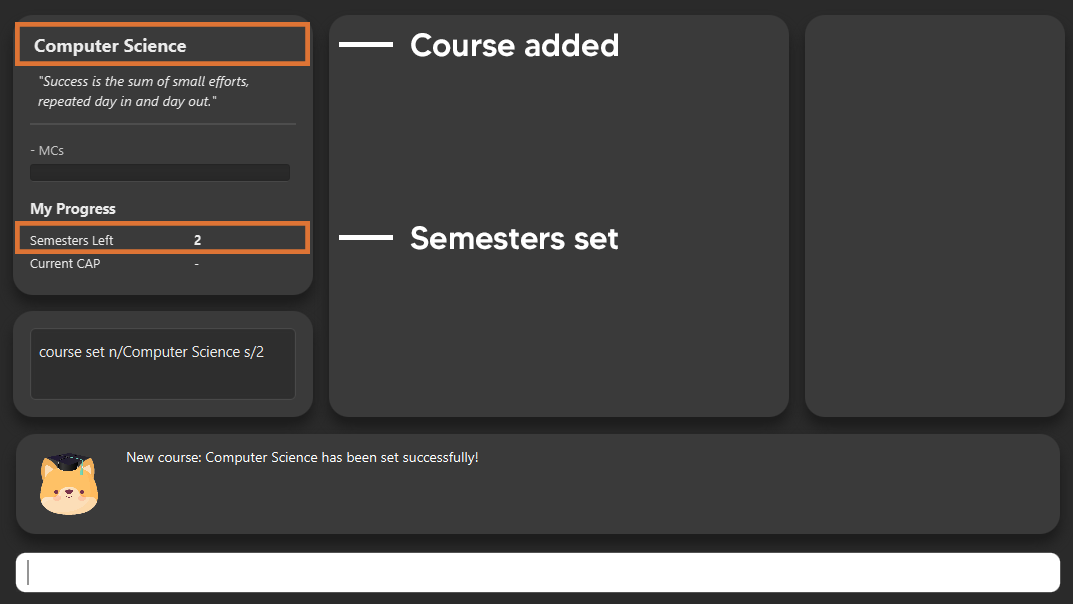
Enter your course details
Section by: Daryl
-
Course refers to the name of the course you are currently enrolled in.
-
Enter the name of your course in the format:
course add n/COURSE_NAME s/TOTAL_SEMESTERS -
E.g.
course add n/Computer Science s/2
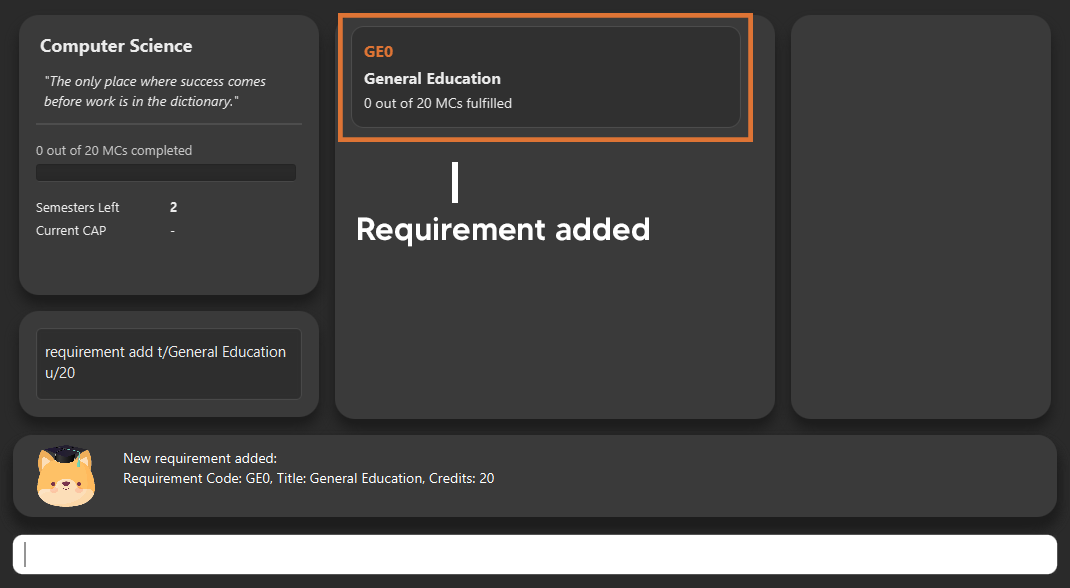
Key in your graduation requirements
Section by: Daryl
-
Requirements refer to degree requirements needed in the entered course.
-
Enter your course graduation requirements in the format:
requirement add t/REQUIREMENT_TITLE u/MCS_REQUIRED -
E.g.
requirement add n/General Education u/20
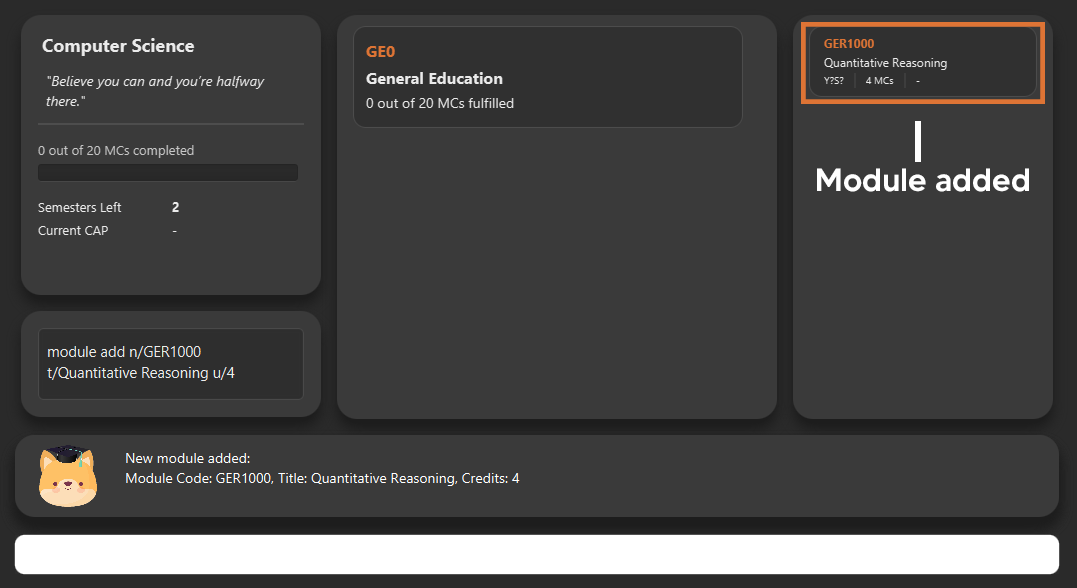
Add modules to the tracker
Section by: Daryl
-
Modules refer to modules that you have taken or are planning to take.
-
Enter modules into the system in the format:
module add n/MODULE_CODE t/MODULE_TITLE u/MCs -
E.g.
module add n/GER1000 t/Quantitative Reasoning u/4
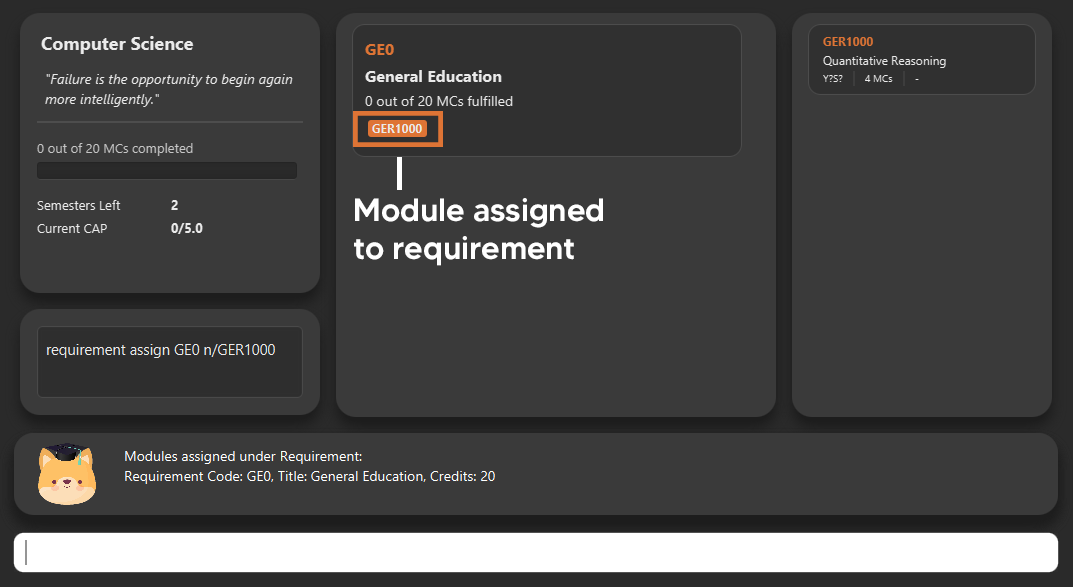
Assign your modules
Section by: Daryl
-
Assign modules under their respective requirements.
-
Enter assign in the format:
requirement assign REQUIREMENT_CODE n/MODULE_CODE -
Note: Requirement codes are generated by the system.
-
E.g.
requirement assign GE0 n/GER1000
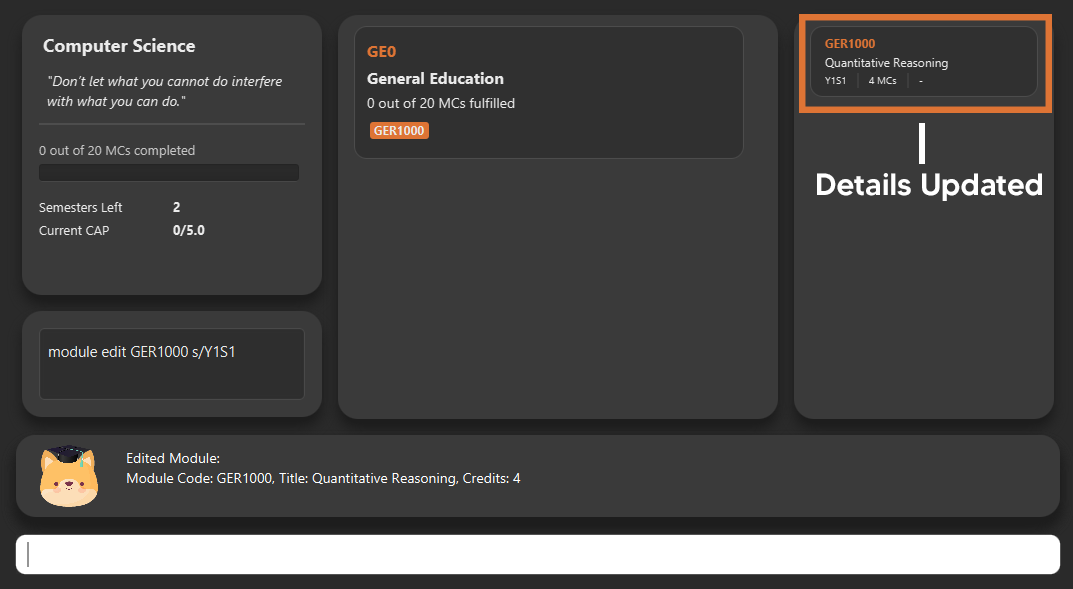
Key in additional details for your modules
Section by: Teri
-
Edit modules with additional information such as Semester. Other information that has already be input can be edited as well.
-
Enter edit to be done to the module in the format:
module edit MODULE_CODE s/SEMESTER -
Note: For Semester, it has to follow the format of
Y_S_ -
E.g.
module edit GER1000 s/Y1S1
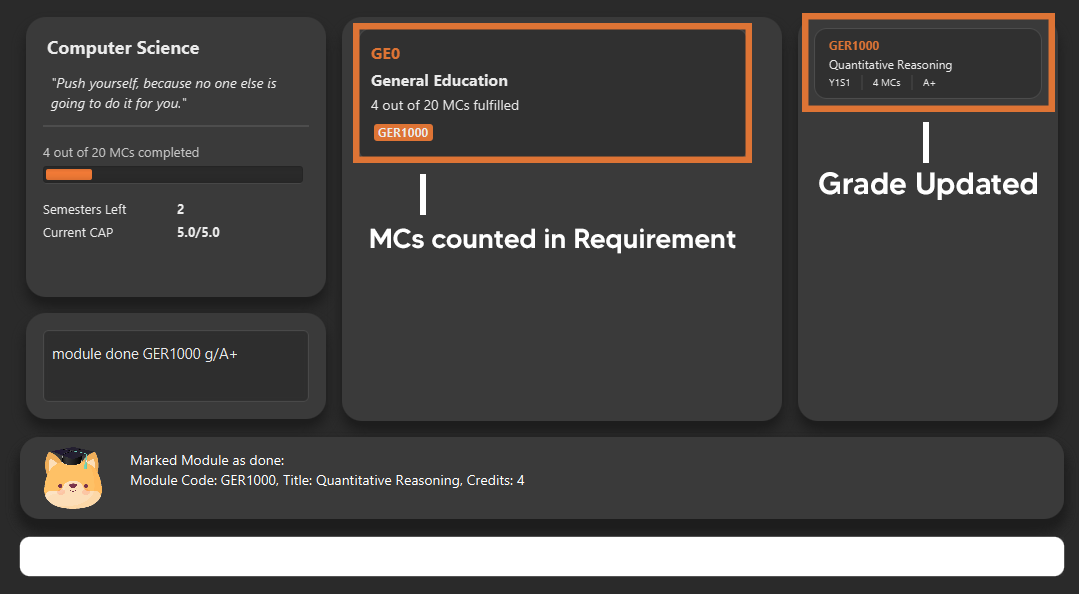
Mark a module as done and assign a grade to it
Section by: Teri
-
A module is considered as done when a grade is assigned to it.
-
Enter grade for the module in the format:
module done MODULE_CODE g/GRADE -
E.g.
module done GER1000 g/A+
Track your MCs
Section by: Teri
-
MCs refer to Module Credits.
-
MCs are automatically tracked and updated.
-
Total MCs count is the total of all requirement MCs.
-
MCs are fulfilled when modules that are within a requirement are marked done.
View your CAP
Section by: Teri
-
CAP refers to Cumulative Average Points and is out of 5 (max).
-
CAP is automatically tracked and updated.
-
CAP is updated whenever a module within a requirement is marked done with a grade.
Export your data
Section by: Teri
-
Data of your entire study plan can to exported to a comma-separated values (.csv) file.
-
Export your data in the format:
export -
Note: Data file can be found in the same folder as this application.


Cheat Sheet
Section by: Daryl
This segment contains a consolidated view of all the commands utilised in iGrad. Commands are split into the following
categories:
-
Essential Commands
-
Course Commands
-
Requirement Commands
-
Module Commands
Essential Commands
| Description | Command |
|---|---|
Open the help window |
|
Undo last command |
|
Export data |
|
Exit the application |
|
Course Commands
| Description | Command |
|---|---|
Add a |
|
Edit the |
|
Delete the |
|
Find out |
|
Requirement Commands
| Description | Command |
|---|---|
Add a |
|
Edit a |
|
Delete a |
|
Assigns the |
|
Module Commands
| Description | Command |
|---|---|
Add a |
|
Edit a |
|
Delete a |
|
Mark a |
|
Contributions to the Developer Guide
Given below are the sections I contributed to the Developer Guide. They showcase my ability to communicate technical information into documentation as well as my contributions to the project. |
UI component
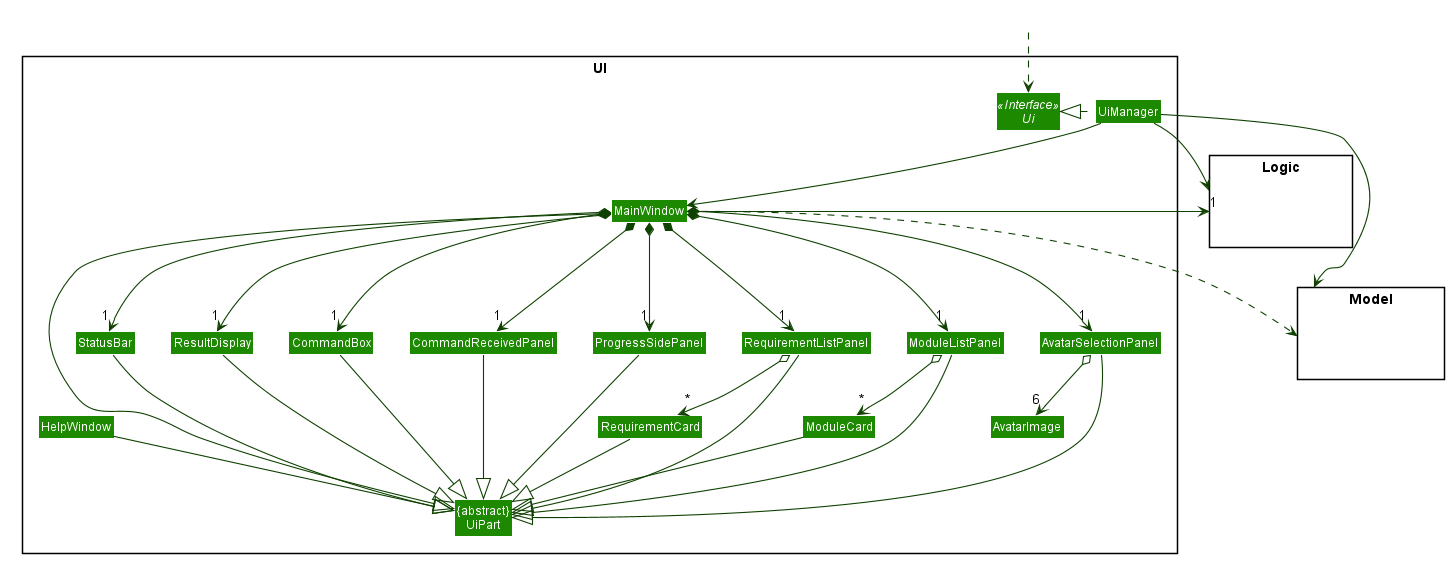
API : Ui.java
Section by: Daryl
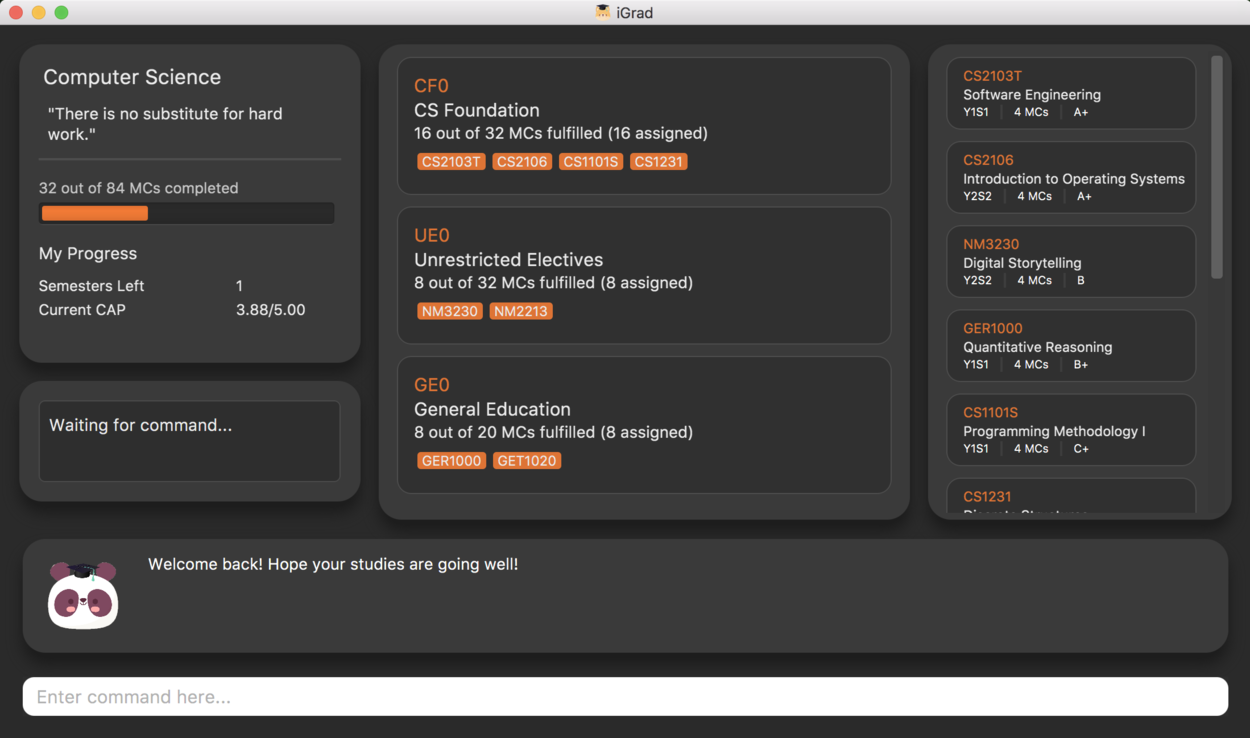
The UI consists of a MainWindow that is made up of parts e.g.CommandBox, ResultDisplay, ModuleListPanel, StatusBar etc.
All these, including the MainWindow (excluding AvatarImage), inherit from the abstract UiPart class.
The UI component uses JavaFx UI framework.
The layout of these UI parts are defined in matching .fxml files that are in the src/main/resources/view folder.
For example, the layout of the MainWindow is specified in MainWindow.fxml.
The UI component,
-
Executes user commands using the
Logiccomponent. -
Listens for changes to
Modeldata so that the UI can be updated with the modified data.
MainWindow
The MainWindow class serves as the hub for all the UI components, and contains the following UI classes:
-
AvatarSelectionPanel- Avatar selection screen on first-time startup. -
CommandBox- Command box for user input. -
CommandReceivedPanel- Displays the last command entered. -
ResultDisplay- Displays the resultant message of the command entered. Also contains the avatar image. -
ModuleListPanel- Panel displaying the modules input into the system. -
RequirementListPanel- Panel displaying the requirements input into the system. -
ProgressSidePanel- Panel displaying the user’s academic progress and fundamental details (Eg. CAP).
The MainWindow coordinates the development between the backend and frontend components to induce a visible change to the interface.
This is done through the executeCommand(String commandText, Model model) method. Upon user input, the logic class
executes the command in commandText, and the model is updated to reflect the changes. Subsequently, after the model
has been updated, the following UI classes ResultDisplay and ProgressSidePanel are refreshed as a result.
AvatarSelectionPanel
The AvatarSelectionPanel class displays the avatar selection screen upon first-time startup. Users will choose an
that will act as a guide throughout their usage of the application.
CommandBox
The CommandBox class contains an editable TextArea JavaFX component which allows the user to enter input commands.
CommandReceivedPanel
The CommandReceivedPanel class contains a panel that shows the last command entered into the system.
Here is an example of how the CommandReceivedPanel works:
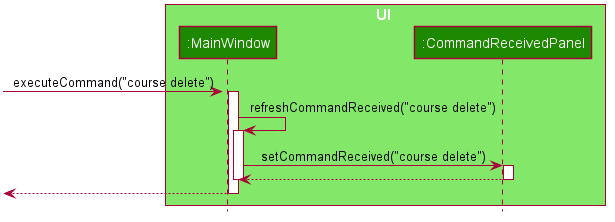
-
Command executed on
MainWindow. -
MainWindowcalls the methodrefreshCommandReceivedPanel, which refreshes theCommandReceivedPanel. -
CommandReceivedPanelupdates its JavaFXLabelwith theStringof the command given. -
CommandReceivedPaneldisplays visible change on the interface. -
refreshCommandReceivedPanelends execution.
ResultDisplay
The ResultDisplay class shows the resultant message generated from the user’s input.
The avatar will also showcase a different expression according to the success of the command given.
Here is an example of how the ResultDisplay works:
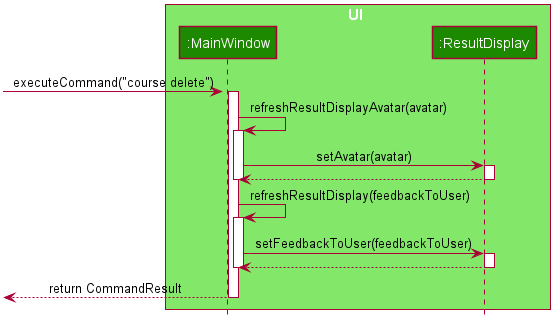
-
Command executed on
MainWindow. -
MainWindowcalls the methodrefreshResultDisplayAvatar, which refreshes theAvatarinResultDisplay. -
ResultDisplayupdates its JavaFXImageViewaccording to theAvatarof the command given. In this case, when no exception is thrown, theAvatardisplays that of a positive expression. -
refreshResultDisplayAvatarends execution. -
ResultDisplaydisplays visible change on the interface. -
MainWindowcalls the methodrefreshResultDisplay, which refreshes the resultant message displayed inResultDisplay. -
ResultDisplayupdates its JavaFXTextAreaaccording to theCommandResultof the command given. In this case, the TextArea will display the 'success' message generated as a result of the command. -
ResultDisplaydisplays visible change on the interface. -
refreshResultDisplayends execution.
ModuleListPanel
The ModuleListPanel class contains the ObservableList<Module> JavaFX component allowing for a list view of the
components inside it, in this case, a list of ModuleCard objects.
The contents of the list are dependent on the modules that the user has input into the system. Each module will be
displayed as a ModuleCard object.
RequirementListPanel
The RequirementListPanel class contains the ObservableList<Requirement JavaFX component allowing for a list view of
the components inside it, in this case, a list of RequirementCard objects.
The contents of the list are dependent on the requirements that the user has input into the system. Each requirement
will be displayed as a RequirementCard object.
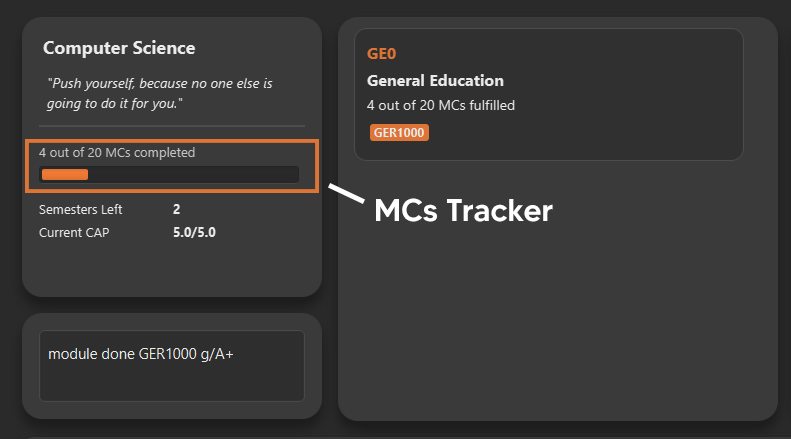
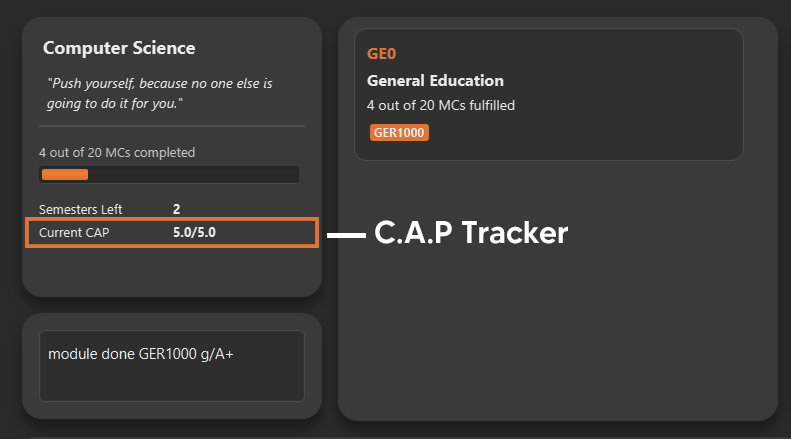
ProgressSidePanel
The ProgressSidePanel class contains the user’s academic progress, as well as essential information. The following
information is displayed on the ProgressSidePanel:
-
Coursename -
Inspiring quote from
QuoteGenerator -
Modular Credits Progress Indicator
-
Semestersleft -
Current Cumulative Average Point (C.A.P)
Here is an example of how the ProgressSidePanel works:
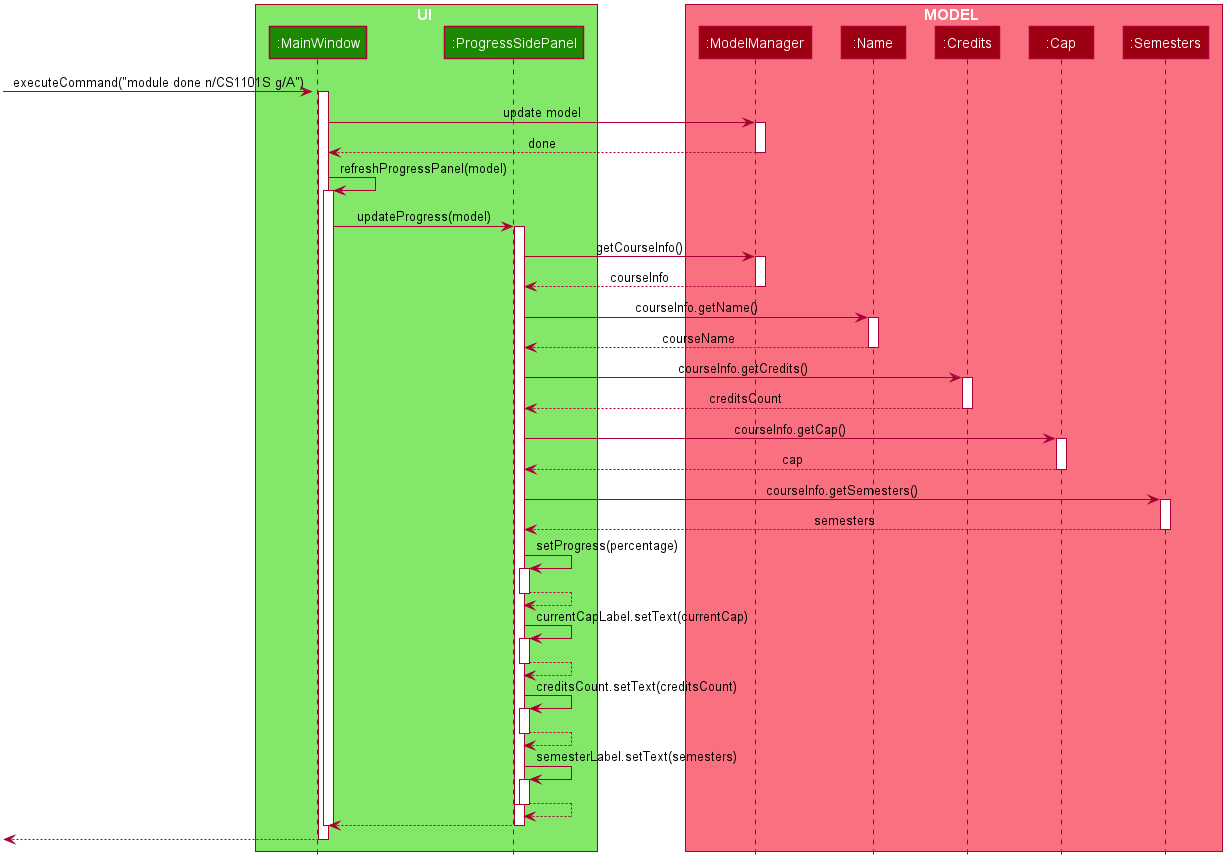
-
Command executed on
MainWindow. -
Modelis updated. -
MainWindowcalls the methodrefreshProgressPanel, which refreshes theProgressSidePanel. -
ProgressSidePanelusesModelto obtain the correspondingCourseInfoinformation:-
Name -
Credits -
Cap -
Semesters
-
-
ProgressSidePanelexecutes corresponding JavaFX methods to update displayed information. -
ProgressSidePanelshows visible change on the interface. -
refreshProgressPanelends execution.
Other Components
In addition to the main UI components grouped in the MainWindow class, these are the other UI components that are
relevant to the interface:
-
AvatarImage- Contains the image of the avatar. -
ModuleCard- Individual card containing the relevant information of the module. List ofModuleCardcontained in theModuleListPanel. -
RequirementCard- Individual card containing the relevant information of the requirement. List ofRequirementCardscontained in theRequirementListPanel. -
HelpWindow- Pop-up window containing the link the User Guide, as well as a list of all the commands in the application.